 Brainerce Help
Create a sales channel
Open Sales Channels in the Brainerce dashboard and create a vibe-coded storefront channel. You'll come away with a single Connection ID that wires your storefront to your catalog.
This page walks you through creating a vibe-coded storefront channel. By the end you'll have a vc_* Connection ID, the one string you'll paste into your storefront's .env on the connection step.
Quick steps
- Sidebar → Sales Channels.
- Click + Add channel.
- Fill in Channel Name (the only required field).
- Pick a Site Type. Full Store is recommended for a normal storefront.
- Create (or press Ctrl + Enter), then copy the Connection ID from the channel page.
The detailed walkthrough below covers what each field does, what the three site types actually unlock, and how the Test/Live modes secure the channel.
1. Open the Sales Channels page
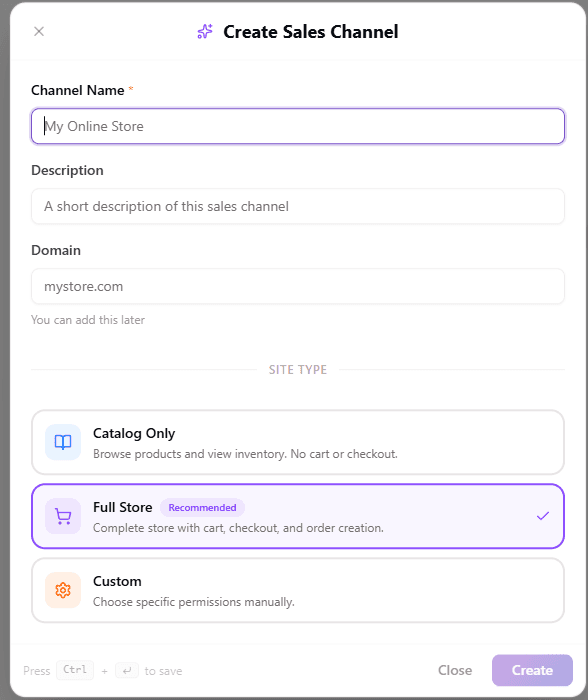
In the dashboard sidebar, open Sales Channels. You'll see a list of every channel attached to your store. On a brand-new account the list is empty and a single Add channel button sits in the middle of the page; once you have at least one channel, the button moves to the top-right; click it to open the Create Sales Channel modal.
Free plan note. The Free plan allows exactly one sales channel. If you hit the cap, + Add channel opens an upgrade dialog instead. Upgrade to add more channels or contact support.
There is only one kind of channel: every channel you create is a vibe-coded storefront (the type that exposes a
vc_*Connection ID and connects via SDK). Google Shopping and the Meta catalogue are not separate channel types: you install an app under Apps and attach it to a vibe-coded channel, and it feeds that channel's products out. TikTok Shop is out of scope entirely. Shopify and WooCommerce aren't channels either; they are one-time import sources inside the Migration Tool, see Import from another platform.
2. Name, describe, and (optionally) point at a domain
The top of the modal has three text fields:
| Field | Required? | What goes here |
|---|---|---|
| Channel Name | Yes | An internal name, just for you. "Main storefront", "Israel store", "Black Friday popup". |
| Description | No | A short note about what this channel is for. Visible in the channel list only. |
| Domain | No | The domain the storefront will live on (mystore.com). Leave blank if you don't have one yet. "You can add this later" is a real promise; the channel works fine without it. |
The Channel Name is the only thing you have to fill in before you can save.
3. Pick a Site Type
This is the most important choice on the page. The Site Type controls which API permissions the channel carries, meaning what the storefront connected to this channel is allowed to do.
There are three options:
Catalog Only
Browse products and view inventory. No cart or checkout.
A read-only window into your catalog. The connected site can list products, show details, see stock levels and categories, but cannot add to cart, take an order, or sign customers in. Pick this when:
- You're building a content site (blog, lookbook, marketing landing) that should link out to a separate checkout flow.
- You're running a price-comparison feed or partner catalog where someone else handles the transaction.
- You want a menu / product showcase (restaurant, gallery, B2B catalog) without commerce on the same surface.
Full Store (Recommended)
Complete store with cart, checkout, and order creation.
The normal storefront permission set: everything from Catalog Only, plus cart, checkout sessions, customer login/registration, and order creation. Pick this for any real storefront: a vibe-coded site built in Lovable, Cursor, Claude Code, etc. It's the option the scaffolder and templates both assume.
Custom
Choose specific permissions manually.
Selecting Custom expands a panel of individual permission toggles. Use this when you need a setup the two presets don't cover, for example a cart-enabled site that doesn't create orders (because orders are placed via a separate POS), or a guest-only storefront with no customer accounts.
The toggles you'll see:
| Permission | What it controls |
|---|---|
| Products | Read products, variants, and images. Almost always on. |
| Inventory | Read stock levels per variant. Required to show "In stock / Out of stock" badges. |
| Categories | Read categories and collections. Required for category nav and landing pages. |
| Cart | Create and manage shopping carts. Required for any add-to-cart UI. |
| Checkout | Create checkout sessions. Required to send customers to the hosted checkout. |
| Customer Auth | Login, register, and manage customer accounts. Required for member areas and saved orders. |
| Orders | Create orders directly (requires extra permission). For custom flows that bypass checkout: POS, B2B order entry, etc. |
Default toggle states under Custom mirror Catalog Only (Products, Inventory, Categories on; the rest off). Flip the ones you need.
You can change permissions later. The new channel's settings page has a Permissions tab where every toggle from Custom is available again. Bumping a channel from Catalog Only to Full Store later is fine; the
vc_*ID stays the same, so the storefront doesn't need to be rewired.
4. Save and copy the Connection ID
Hit Create at the bottom-right of the modal, or press Ctrl + Enter from anywhere in the form.
The new channel's settings open on the General tab, and you can reopen them anytime by clicking the channel's card on the Sales Channels page. There are five tabs, in two groups.
Under Channel: General (name, test/live mode, domains, and a read-only line showing how many products are published to this channel and which marketing apps are connected to it), Permissions, Inventory (how stock is reserved for this channel, on cart, on checkout, or on payment, and the reservation timeout), and Upsell & Cross-sell (storefront merchandising for this channel: free-shipping bar, frequently-bought-together, cart bundles, and order bumps).
There is no Sync tab in channel settings. Syncing products out to a platform is done on that app's own page, not here. See Where to sync products to Google below.
Under Handle with care: Danger Zone, on its own. It sits under a separate heading, at the bottom, because everything in it is destructive. That separation is the only warning you get before you open it.
On a computer the tabs run down the left. On a phone they become a row of pills across the top of the settings window that you swipe sideways: same five tabs, same order, no group headings.
On General, at the top you'll see:
- Connection ID starts with
vc_(e.g.vc_Fpi183aYc3WAqQnphxzWM). This is the one string the storefront needs. It identifies the channel and carries the permissions you picked above.
A Copy button next to the ID copies it to the clipboard. The ID stays visible on the page, so there's no "shown once" pressure here. You can come back to Sales Channels → your channel → General anytime to copy it again.
Skip the copy-paste and use Build with AI. Click Build with AI, the violet button at the bottom of the tab list, below Danger Zone, to open a modal with everything pre-baked for the next step: a
npx create-brainerce-store@latest --connection-id vc_…one-liner ready to paste into a terminal, an AI Prompt for tools like Lovable that already has your Connection ID embedded, and the MCP Server URL so AI tools can query Brainerce docs live while building. The connection docs (CLI, Lovable) walk through each block.
5. Test mode vs Live mode (and the domain)
New channels start in Test mode. The channel's General tab has a Channel Mode toggle with two options:
| Mode | Domain field | Who can call the channel? |
|---|---|---|
| Test | Optional. Leave it empty and localhost, previews, any URL are all accepted. | Any host can use the Connection ID while Domain is empty. Fill Domain in and a Test channel starts checking addresses like a Live one. Right for development, previews, AI builders. |
| Live | Required, and must be a public HTTPS domain. | Only the primary domain, its subdomains, and the extra addresses listed in the Domains box. Right for production. |
This is how Brainerce secures a published channel: in Live mode, the Connection ID alone isn't enough; the request also has to come from the registered domain. So even if the ID is visible in client code (which it is, by design), no one can stand up a clone on a different host and use your channel.
The workflow most teams follow:
- Create the channel, which stays in Test mode by default.
- Build, design, and preview the storefront on
localhostor the AI builder's preview URL (Lovable preview, Bolt sandbox, etc.). All of these work in Test mode without a domain. - Once you're ready to publish to the real world, register your production HTTPS domain on the channel and flip Channel Mode to Live. From that moment, only that domain, its subdomains, and any extra addresses you add in the Domains box (below) can use the channel.
Heads-up before flipping to Live. Make sure the production domain matches exactly (no trailing slash, no typos in subdomain). A mismatch will block every request from the storefront until corrected.
A Domain on a Test channel is a real lock, not a label. The "any host works" freedom described above belongs to a Test channel with an empty Domain box. The moment you record one, requests are checked the same way Live checks them, and the check counts the port: a Domain of
localhost:3000refuses a shop served onlocalhost:5173, and refuses a barelocalhostwith no port. That is also whynpx create-brainerce-storecan reportOrigin not allowed for TEST channelagainst a channel you know exists. Either clear the Domain box while you develop, or record the exact address your dev server prints.
Keep building after you go Live (the Domains box)
Going Live used to mean you could no longer work from a preview URL or your own machine against that channel: the only options were swapping the production domain or flipping back to Test mode, and both take the shop down for everyone else.
You don't have to choose any more. Open Sales Channels → your channel → General and find the box labelled Domains. It is one field holding a list of addresses:
- Type an address and press Enter (or click Add) and it becomes a chip in the box.
- The first chip wears a ★ Primary badge. That is your channel's main domain: it builds your product links, and it also covers its own subdomains: register
shop.comandwww.shop.comandcheckout.shop.comwork too. - Every chip after the first is an extra address allowed to use this channel. Add the one you're building from: your Lovable or Bolt preview URL,
http://localhost:3000, a staging site. Up to five extras, on top of the primary. - Remove any chip with the × on it. Removing the primary chip clears the channel's domain, which a Live channel needs, so put a new one in before you save.
Paste the whole URL if that's what you copied. https://Preview--abc.lovable.app/products/shoes?ref=1 is trimmed down to https://preview--abc.lovable.app before it's saved, and the box shows you exactly what it's about to store before you press Add.
The extra addresses must match exactly. Unlike the primary chip, an extra address does not cover its subdomains, http is not the same as https, and the port counts, so http://localhost:5173 will not let http://localhost:3000 through. Add each address you actually use. Wildcards like https://*.lovable.app are not accepted.
If one of your saved chips turns red, it no longer passes the current rules and it will block every save on this channel, including unrelated settings, until you remove it. The message under the box names which one.
What the extra addresses do not do: social sign-in. They let an address read your catalog, use the cart and checkout, load the payment window and send analytics. On a Live channel they do not turn on "Sign in with Google / Facebook / GitHub". That always returns through your registered domain, and nothing else. This is on purpose: sign-in hands back a customer's login token, and that only ever goes to the domain you verified. If you need to test social sign-in from a preview address, do it on a Test channel, where the extra addresses cover it too.
6. Choose which products this channel sells
By default, products you create are not published to a new channel; you opt in product by product. Two ways:
- One product at a time. Open the product, scroll to Publish to Platforms, toggle the new channel on.
- Bulk. From the products list, select multiple products → Bulk actions → Publish to channel → pick the new channel.
Until at least one product is published, the storefront loads with an empty catalogue and there is nothing anyone can put in a basket. Publishing is what puts a product on sale on a shop, so an unpublished product cannot be bought there even by direct link.
Where to sync products to Google
Channel settings has no Sync tab and no "Sync now" button. If you are looking for one, it is on the app's own page, not here.
Go to Apps, open Google, pick the sales channel at the top, and use Sync now there.
Google is the only app you can sync products to today. The Meta and TikTok apps are built but have not been released, so they are not in your app store and there is no Meta or TikTok page to press Sync now on. If you came here to push your catalogue to a Facebook shop or TikTok Shop, that is not available yet. Shopify and WooCommerce are not sync targets either, in any direction: they exist only inside the Migration Tool as one-time read-only imports, so nothing you change in Brainerce is ever pushed back to them. See Import from another platform. That button pushes to that one app, shows a spinner while the run is in progress, and tells you afterwards how many products landed and what the platform said about any that did not. Use it when a channel looks out of date and you want to force it to catch up rather than wait.
Two things a manual sync will not do for you:
- A channel in test mode is never pushed anywhere. Google rejects test domains, so a sync from a test channel is skipped rather than attempted. Switch the channel to Live on the General tab first.
- A product that is not published to the channel is not synced by it. Publishing is a per-product setting in the products table (Publish to Platforms), and syncing only re-sends what is already published.
The General tab of channel settings shows you where a channel stands without leaving it: how many products are published to the channel, which apps are connected to it, and when each of them last synced. It is a read-out only. Every button that changes something lives in the app.
What's next?
You now have a vc_* Connection ID. Pick your connection path:
- You have a terminal (Cursor, Claude Code, Copilot, Codex CLI, Bolt, Replit) → Connect with the CLI scaffolder.
- You're using Lovable → Connect from Lovable.
What are sales channels
A sales channel is a single point-of-sale wired to your Brainerce catalog. One Brainerce store can power many vibe-coded storefronts across multiple brands, locales, and domains from one dashboard.
Connect with the CLI scaffolder
Open Build with AI on your sales channel, copy the npx one-liner, and paste it into Cursor, Claude Code, Copilot, Codex CLI, Bolt, or Replit. A Next.js storefront pre-wired to your channel is ready in under a minute.