 Brainerce Help
Add custom checkout fields
Collect extra information from customers at checkout (gift messages, company names, tax IDs, delivery notes) and optionally add a surcharge.
Custom checkout fields let you ask customers for extra details during checkout: a gift message, a company name and tax ID, a floor number, delivery notes, and more. You can make a field required, show it only in certain situations, and even attach a surcharge.
Where to manage fields
Go to Checkouts → Custom Fields in the sidebar. This page lists every field you've created and lets you add new ones.
1. Create a field
- Click New Field.
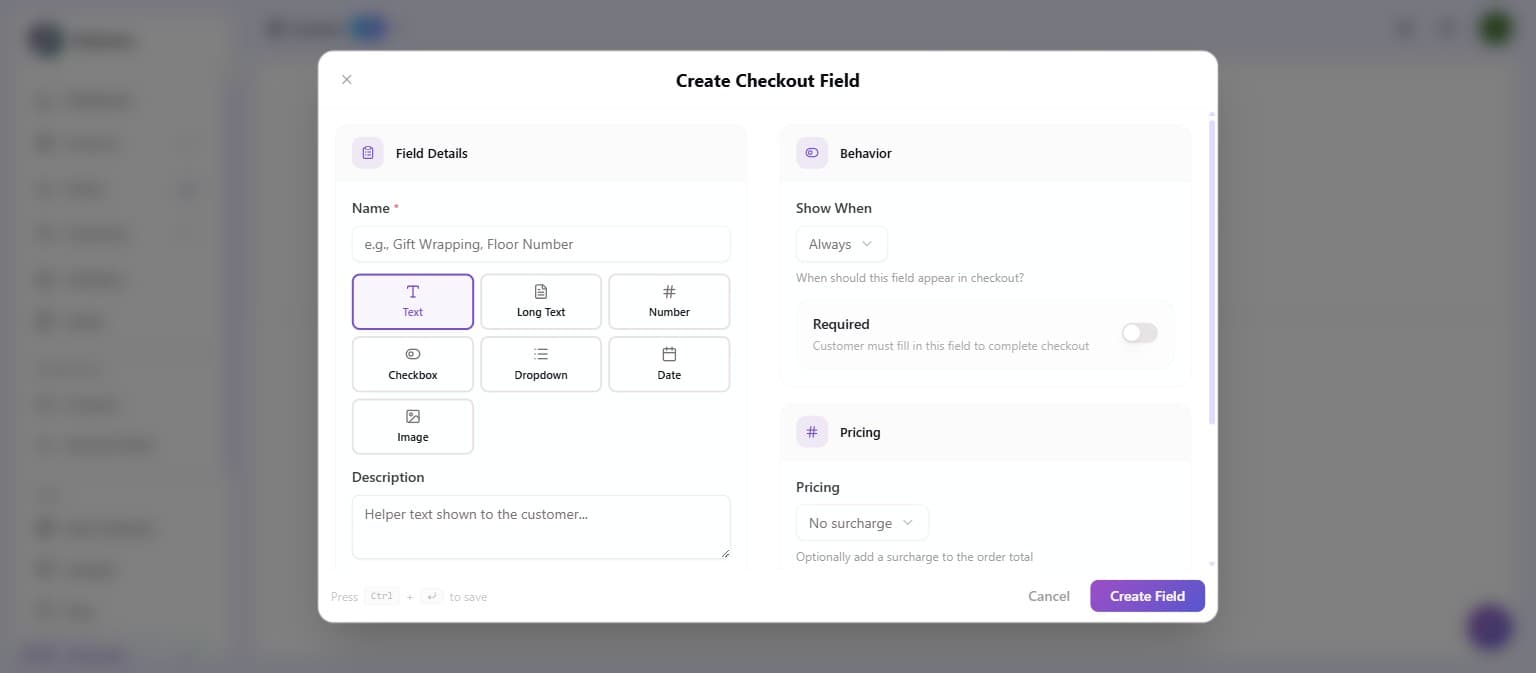
- In the Create Checkout Field dialog, fill in:
- Name is what the customer sees (e.g. Gift message, Floor number).
- Type is the kind of input (see the table below).
- Description (optional) is helper text shown under the field. Press Enter to split it across lines, and storefronts render the line break. Stores scaffolded before August 2026 show the break as a space instead; regenerate or update the storefront template to pick it up.
- Key is an internal identifier. Leave it blank and it's generated from the name. It can't be changed after the field is created.
- Set the Behavior:
- Show When sets when the field appears (see Show a field only when relevant).
- Required, when on, stops your storefront letting the customer finish checkout with this field empty. It's your storefront that applies the block, so if you had a developer build a custom checkout, it only works if their checkout sends the field values back to Brainerce. See Required vs. optional.
- (Optional) Add a surcharge under Pricing. See Charge for a field.
- Click Create Field.
Field types
| Type | Use it for |
|---|---|
| Text | A name, company, or tax ID |
| Long Text | Delivery notes or a gift message |
| Number | A floor number or quantity |
| Checkbox | Opt-ins like "Add gift wrapping" |
| Dropdown | A choice from preset options |
| Date | A preferred delivery date |
| Image | An ID document or reference image |
For Text, Long Text, and Number fields you can also set min/max length or value under Validation.
Required vs. optional
Use the Required toggle in the Behavior section. When on, the checkout won't go through until the field is filled. Leave it off to make the field optional.
Required is only enforced while the field is actually showing. If you also limit the field with Show When below, a cart that stops matching hides the field, and a hidden field never blocks checkout.
If you had a developer build your checkout, check this one. The "required" rule is applied at the moment the storefront sends the field values to Brainerce. A custom-built checkout that never sends them will take the order anyway, with the field blank, required or not. Storefronts scaffolded by Brainerce already do this correctly; a hand-built one needs to call the checkout custom-fields step. If you're seeing orders come through with a required field empty, that's the cause, not a setting on this page.
Show a field only when relevant
To limit when a field appears, set Show When inside the Behavior section when creating or editing the field:
- Always: the field appears on every checkout (default).
- Shipping only: the field appears only when the customer is getting the order shipped. Set this for fields like "Delivery notes" or "Floor number" that only apply to delivery orders.
- Pickup only: the field appears only when the customer selects store pickup.
- Specific products: the field appears only when the cart holds at least one of the products you pick, or a product from any of the categories you pick. Both pickers appear once you choose this option, and you need at least one entry in one of them to save the field. Use it for fields tied to particular items, like "Engraving text" on rings.
Example: to collect a "Delivery notes" field only for shipped orders → create the field → in Behavior → set Show When to Shipping only.
Filling both pickers widens the match: the field shows when the cart matches a product or a category, never only when it matches both.
Charge for a field (surcharge)
To add a surcharge to a field, expand the Pricing section when creating or editing it and pick a surcharge type:
- No surcharge collects information only, with no cost added (default).
- Fixed surcharge adds a flat fee whenever the field is filled (e.g. gift wrapping: always adds ₪5). Select this → enter the amount.
- Surcharge when checked is for a Checkbox (Yes/No) field: charge only when the customer ticks it on. Ideal for "Add gift wrapping +₪5". Select this → enter the amount.
- Price per option is for a Dropdown field: set a different price per choice (e.g. Standard box: ₪0, Premium gift box: ₪15).
- Conditional surcharge is for a Number field: charge based on a threshold rule (e.g. add ₪10 when quantity is above 5).
The surcharge amount is automatically added to the order total and appears as a line item in the order summary.
Where the data appears
After a customer checks out, open the order from Orders. The values they entered, and any surcharge that was applied, appear in the order summary alongside the line items.
Manage existing fields
On the Custom Fields page you can edit a field, toggle it Active (inactive fields stop appearing on new checkouts), or delete it. Remember the field's Key can't be changed once created.
Restricting the dates a customer can pick
A Date field can do more than accept any date. Open its availability settings to constrain what the customer may choose:
- Earliest and latest date, for example no sooner than tomorrow, no further out than three months.
- Blocked weekdays, if you never deliver on Saturdays.
- Blocked specific dates: public holidays, your own closures.
- Business hours and time slots, when you also need a time, not just a day.
This is what turns a date field into a workable delivery-slot or booking picker, and it prevents the orders you'd otherwise have to phone people about.
What's next?
Need a hand? Email [email protected].