 Brainerce Help
Manage contact inquiries
Reply to messages from your storefront contact forms, organize them by status and priority, and build the forms themselves.
When a visitor submits a contact form on your storefront, the message lands in Inquiries, a shared inbox your team can work from. You can also design the contact forms here.
Open it from Customers → Inquiries in the sidebar.
The inbox
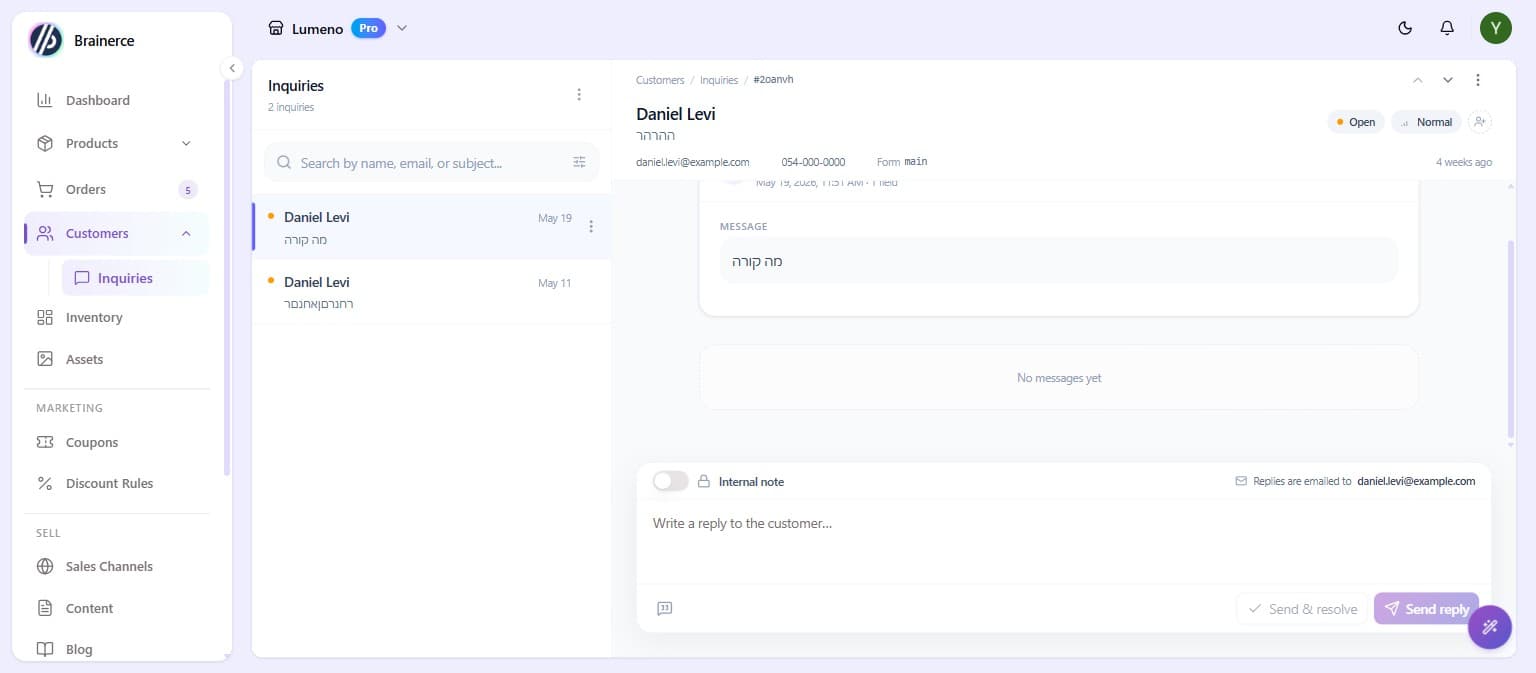
Inquiries uses a two-pane layout: the list on the left, the selected conversation on the right. Opening a New message automatically marks it as Open.
Statuses
| Status | Use it for |
|---|---|
| New | Unread, just arrived |
| Open | An active conversation |
| Waiting on customer | You've replied; awaiting their reply |
| Waiting on staff | Needs action from your team |
| Resolved | Handled |
| Closed | Archived |
Each inquiry also has a priority: Low, Normal, High, or Urgent.
Reply to a customer
- Select an inquiry from the list.
- Type in the composer at the bottom and click Send reply, and your message is emailed to the customer.
- Or click Send & resolve to reply and mark it resolved in one step.
Switch the composer to Internal note to leave a private message only your teammates can see. Use Templates for canned replies like Thanks / Acknowledge or Looking into it.
Set status, priority, and assignee
From the conversation header you can change the status, set the priority, and assign the inquiry to a team member so everyone knows who owns it.
Search and filter
Search by name, email, or subject, and filter the list by status or priority to focus on what matters.
Keyboard shortcuts
| Key | Action |
|---|---|
/ | Focus search |
r | Focus the reply box |
e | Toggle between Resolved and Open |
j / ↓ | Next inquiry |
k / ↑ | Previous inquiry |
Esc | Back to the list |
Ctrl/Cmd + Enter | Send reply |
Ctrl/Cmd + Shift + Enter | Send & resolve |
Build a contact form
The forms your customers fill in are managed from the same place.
- In Inquiries, open the More actions (⋯) menu and choose Manage forms.
- Click + New form, give it a Name and a Key (the key is how your storefront refers to the form, e.g.
contact-us).
Fields
Every form starts with built-in fields: Name, Email, Phone, Subject, and Message. Email and Message are always required. Add your own fields with + Add field; available types include:
- Text, Long text, Email, Phone, Number, URL, Date
- Single select, Multi select, Checkbox
For each field you can set a label, placeholder, help text, whether it's required, its width, validation rules, and (for selects) the list of options.
Settings and translations
In the form's Settings, customize the Submit button text and Success message, bind the form to specific sales channels, and toggle Active and Default. Under Translations, translate the form per language, or use Auto translate, and click Preview to see exactly what customers will see.
Your storefront fetches a form by its key through the SDK. This only works if your site was built to do that. If it was, your fields, button text, success message and translations follow from what you set here, and you never need a code change to edit them again.
If your contact form has its own fields, none of this reaches you
A form somebody coded by hand on your website is not this form. It submits whatever fields were typed into the code, so the fields you set up here never appear to the customer and never arrive with the message. If that hand-written form was never connected to Brainerce at all, the messages go nowhere: the customer sees a thank-you page and your Inquiries list stays empty.
Test it in a minute: open your own website, send yourself a message through the contact form, then refresh this page. If it is not here, the form is not connected, and no setting on this page will change that. Ask whoever built the site to fetch the form from Brainerce by its key and render the fields it returns instead of writing them out by hand. See a feature you turned on is not showing on your website.
Managing your forms
A few things on the forms side that are easy to miss:
- Duplicate a form rather than rebuilding a similar one from scratch.
- Set as default picks which form is used when a storefront doesn't name one.
- Search forms and filter them by sales channel, once you have more than a couple.
- Tag inquiries, mark one unread to come back to it, and delete ones you don't need.
- The Submitted form data panel on an inquiry shows every field the customer filled in, including your custom ones.
Customers receive an automatic confirmation email when they submit a form, so they know it arrived without you replying immediately.
What's next?
Need help with inquiries or forms? Email [email protected].
View and edit a customer profile
Find a customer, see their order history and lifetime value, edit their details, and organize them with tags.
Newsletter signup on your storefront
Collect email addresses from a popup or footer form on your site, how the confirmation step works, and why your subscriber count grows slower than your signups.