 Brainerce Help
Warehouses, suppliers and purchase orders
Multi-location stock in warehouses, assigning existing stock, which warehouse ships each order, splitting a line across warehouses, supplier records, purchase orders and backorders. There is no stock count screen.
You find all of this under Inventory in the sidebar: Warehouses and Purchase orders. Stock transfers is a tab on the Warehouses page, and Suppliers is a tab on the Purchase orders page. If your store has no warehouses, nothing changes: stock stays one number per product or variant.
Once you hold stock in more than one place, "how many do I have" stops being a single number. This part of Inventory answers where stock is, where it's coming from, and whether the count is still true.
Warehouses
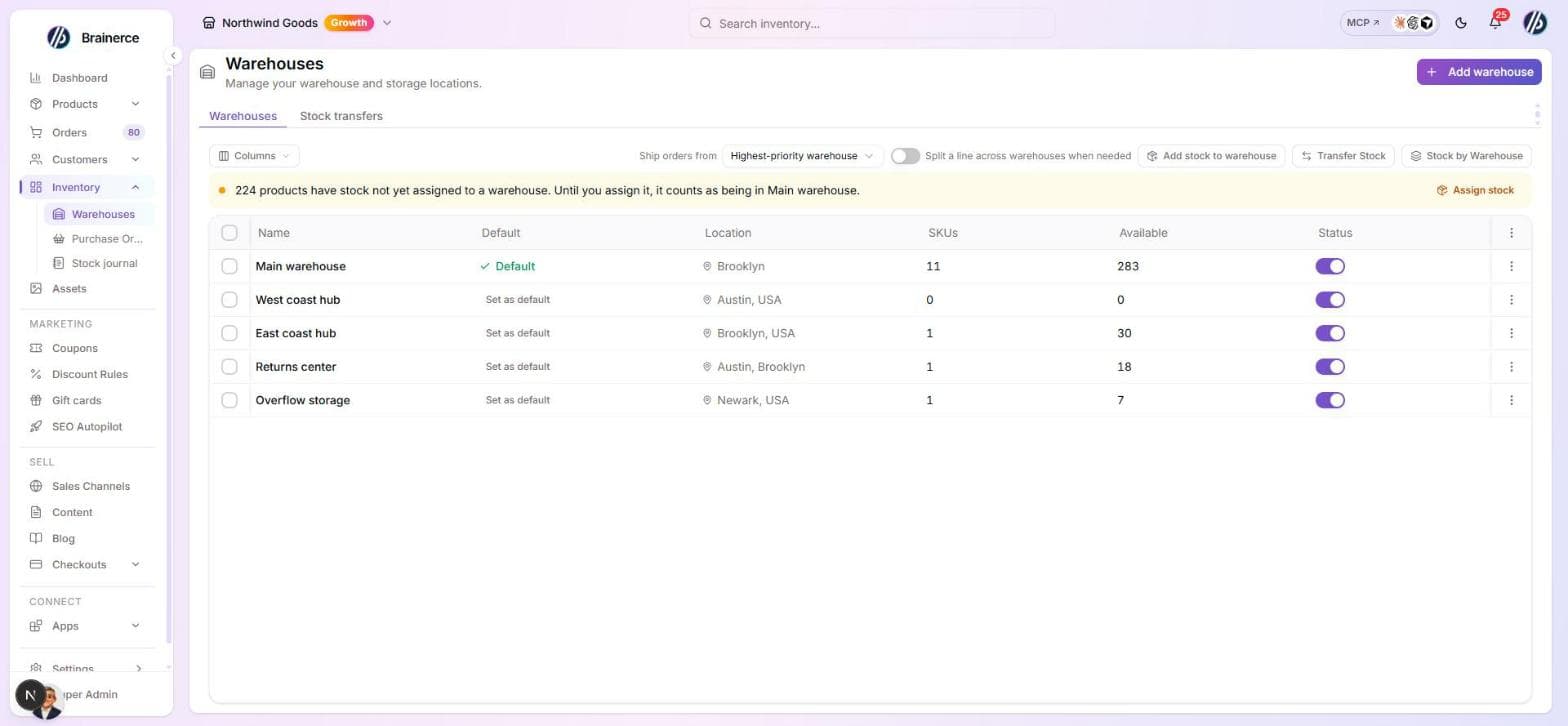
A warehouse is a place stock lives: a unit, a shop floor, a third-party fulfilment centre. Each product's stock is then split across warehouses rather than being one total.
Warehouses carry a location, which lets orders be allocated to the warehouse that makes sense for the delivery address instead of always drawing from the same one.
Your plan sets how many warehouses you can have: Free 1, Pro and Growth 5, Enterprise unlimited. See Plans and limits.
Add a warehouse
Click Add warehouse in Inventory, Warehouses.
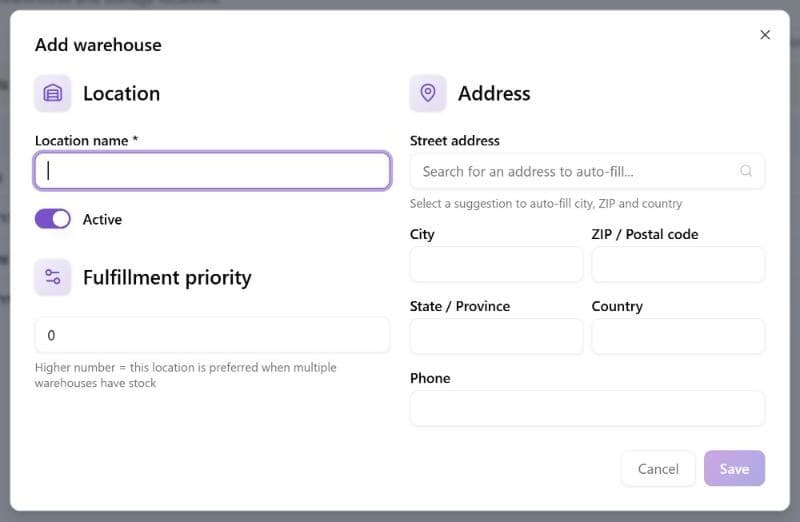
| Field | What it does | Required, limit or default |
|---|---|---|
| Location name | The name shown on the warehouse list, the stock popover and orders. | Required, up to 80 characters. |
| Active | A warehouse that is off keeps its stock in your total but nothing is sold from it. | On by default. |
| Fulfillment priority | A higher number means this location is preferred when several warehouses have stock. | Whole number, 0 or more. Default 0. |
| Street address | Search for the address and pick a suggestion: it fills in street, city, state, ZIP and country, and gives the warehouse a map location, which the nearest warehouse rule needs. | Optional, up to 200 characters. |
| City, State / Province, Country | Filled in by the suggestion, or typed. | Optional, up to 100 characters each. |
| ZIP / Postal code | Same. | Optional, up to 20 characters. |
| Phone | A contact number for the location. | Optional, up to 50 characters. |
At your plan's warehouse limit the add is refused and the plan limit window opens.
The list shows six columns by default: Name, Default (a green mark on the default warehouse, a Set as default button on the others), Location, SKUs, Available and Status (Active or Inactive). Total units, Reserved, Phone, Priority and the separate address columns are hidden until you switch them on in the table settings. Click a warehouse name to open its stock list. The name, priority, status and address cells edit in place, and the row menu has Edit and Delete (a default warehouse has no working Delete).
The toolbar above the list holds Ship orders from and Split a line across warehouses when needed (only with two or more warehouses), Add stock to warehouse (as soon as one warehouse exists), Transfer Stock (two or more warehouses) and Stock by Warehouse.
See what a warehouse holds
Low-stock alert (optional): a number in the warehouse's edit window. When a product at that warehouse has that many units available or fewer, you get the low-stock alert for it. Empty means no alert there. See Get an alert for one warehouse.
Click a warehouse's name to open its page: every product stocked there with SKU, On Hand, Available and Reserved (20 per page, with a search box), a Set quantity button on each row, and Add stock at the top. A product with variants lists each variant. Only products that still have something at that warehouse are listed: units on hand, units held for an open order, or units held back. A product you moved out completely, or set to 0 with nothing held, drops off the list and out of the SKUs count; nothing is deleted, and what happened to it stays in the stock journal. To put stock back, use Add stock.
Stock by Warehouse in the toolbar answers the opposite question: pick a product and see its quantity in every warehouse, set a warehouse's quantity with Set quantity (new quantity and an optional reason), or add stock with Add stock to warehouse. A kit has no warehouse stock, so it offers no add button.
Move stock between warehouses
Click Transfer Stock (it shows when you have two or more warehouses). Choose the Product, the From Warehouse and the To Warehouse (only active warehouses are listed, and the two must differ), type the Quantity (a whole number, 1 or more) and click Transfer. It moves available stock only, never units reserved for orders, and the product's total does not change. Each transfer writes two rows in the stock journal, Transfer out for the warehouse the units left and Transfer in for the one they reached, with the same balance on both. If the From warehouse holds none of the product, it is shown as none and cannot be chosen: assign the product's stock to a warehouse first. Clicking Transfer twice moves the units once.
- This is an instant move. The units are at the other warehouse the moment you click Transfer. If the goods travel and arrive later, use a stock transfer instead, so the units show as incoming until they are received.
- This dialog has no variant picker. It moves a product that has no variants. For a variant's stock, use Add stock and Set quantity on each warehouse, or the warehouse rows in the stock popover (variants are not offered there yet either, see Adjust stock).
Stock transfers: ship now, receive later
A stock transfer is a document for moving stock between two warehouses when the goods take time to arrive. Open Inventory, Warehouses and choose the Stock transfers tab.
- Click New transfer. Choose From warehouse and To warehouse (they must differ), add the products and variants with a quantity each, and add a reference and an expected arrival if you want. Click Create draft. A draft moves no stock.
- Open the transfer and click Ship. The units leave the from-warehouse and your store total now. In transit they are neither on hand nor for sale anywhere, and they show as Incoming at the destination.
- When the goods arrive, open the transfer and set what happened to each line: Accept (the units become available at the destination), Accept as unavailable (they arrive but are held back, with a reason such as damaged) or Reject. Type the quantity and click Confirm receipt.
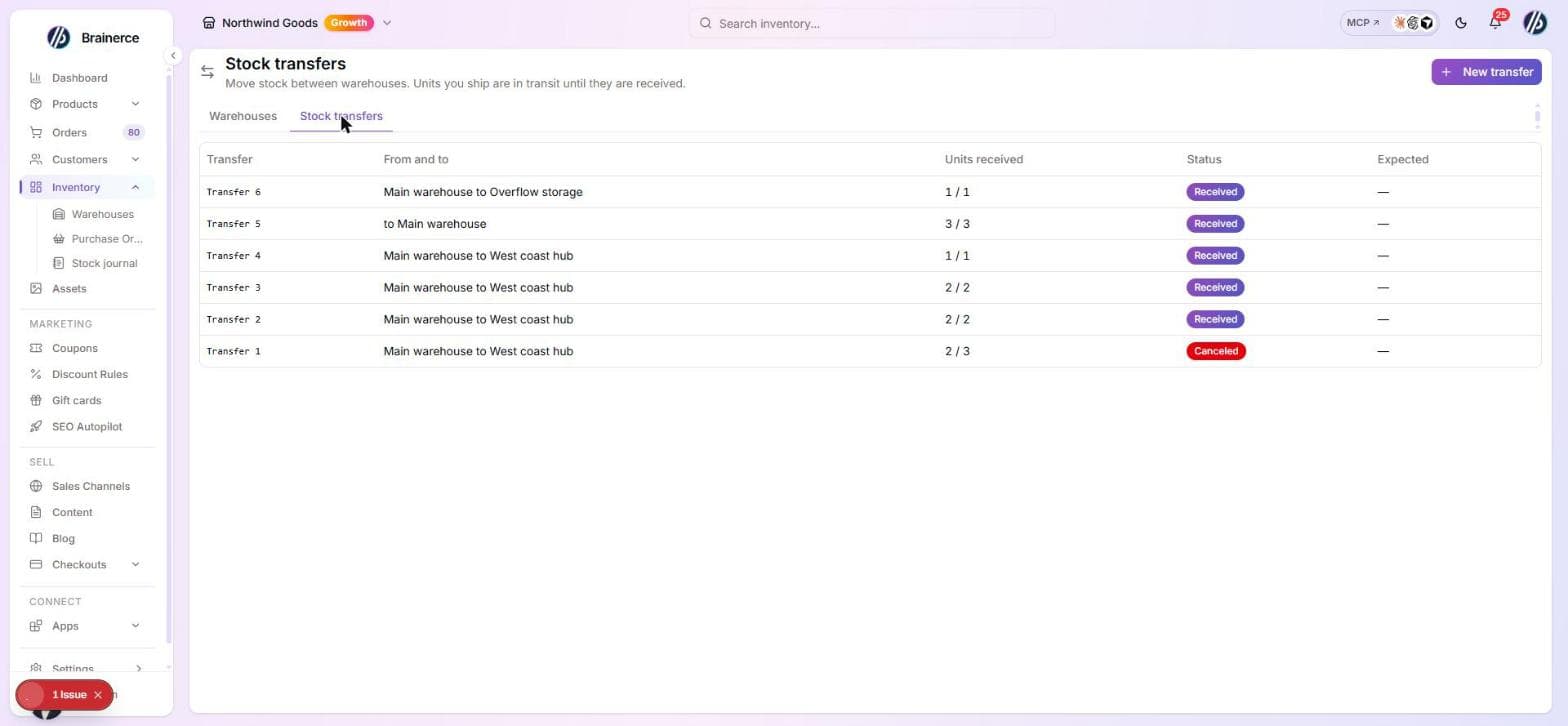
The statuses are Draft, In transit, Partly received, Received and Canceled.
- Webhooks. If you connect other systems, each step of a transfer (draft saved, shipped, received, canceled) can be sent to them as
transfer.created,transfer.shipped,transfer.receivedandtransfer.cancelled, with the two warehouses on every event. Add them to an endpoint under Settings → Webhooks. See webhooks. - You can receive in parts. Receive what arrived and come back for the rest. The transfer shows Partly received and the units still to account for until every unit is accepted or rejected.
- A rejected unit leaves your stock. It is recorded on the transfer and does not come back to either warehouse. If it should return to the from-warehouse, cancel the transfer instead, or add the units back with Add stock.
- Canceling. A draft is canceled with no stock change. A transfer in transit gives back to the from-warehouse the units that were not yet received or rejected. Units you already received stay at the destination.
- Shipping needs the stock. A transfer cannot ship more than the from-warehouse has available. Units reserved for orders cannot be shipped.
- A kit cannot be transferred, and a product with variants is transferred variant by variant.
Delete a warehouse: what happens to its stock, and the default warehouse
A warehouse can be deleted only when it holds no stock and no units reserved for open orders, and the default warehouse can never be deleted. Delete is in the warehouse's row menu, next to Edit. If you want a warehouse to stop selling but keep its numbers, switch it Inactive instead of deleting it.
- Deleting is refused while any units remain in the warehouse. The dashboard says "Cannot delete a warehouse that still has stock. Transfer all stock out first." Use Transfer Stock to move every unit to another warehouse, then delete it. Brainerce never moves or discards stock for you when you delete.
- Deleting is refused while units are reserved for open orders. A warehouse can show 0 on hand after a stock count and still carry units held for an order that has not shipped. The dashboard says "Cannot delete a warehouse that still has units reserved for open orders. Ship or cancel those orders first." Once those orders ship or are cancelled, the hold clears and you can delete.
- Deleting is refused on the default warehouse: "Cannot delete the default warehouse".
- Once it is empty, delete removes the warehouse for good, together with its stock rows that read zero. There is no undo.
- Orders, purchase orders and transfers do not block the delete, and none of them is deleted. A transfer between warehouses happens at once, so there is nothing pending to wait for. A purchase order is not tied to a warehouse: you choose the warehouse when you receive it, and a deleted warehouse is no longer offered. Orders that already shipped keep their history, but the Ships from line for a warehouse that no longer exists is not shown (a line that was split across warehouses shows a question mark in place of the deleted warehouse's name). Its stock was already out of the warehouse, so your totals do not change.
Set the default warehouse, and what the default does
Your store has one default warehouse. Choose it with the Default column, not with Priority. In Inventory, Warehouses, click Set as default on the warehouse you want (or open it with Edit and click Set as default there), then confirm. The warehouse that was the default stops being it in the same step, so there is never more than one.
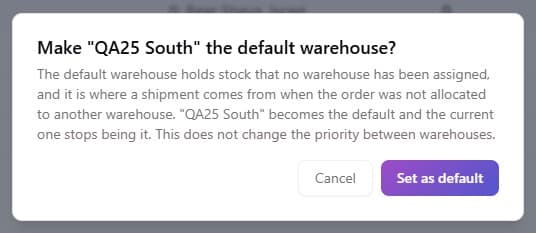
- What the default does. It holds every unit that no warehouse has been assigned (stock from before you used warehouses), and it is where a parcel ships from when an order was not allocated to a specific warehouse. Moving the default moves that stock's home with it. Stock already recorded in a warehouse stays where it is.
- Priority is not the default. The Priority number (hidden until you switch the column on) only ranks warehouses when an order is allocated: a higher number is preferred when several warehouses have the stock. Giving a warehouse priority 1 and another 0 does not make it the default, and the dashboard will still say there is no default warehouse until you use Set as default.
- No default warehouse. Without one, the stock popover shows only the total ("there is no active default warehouse, so stock cannot be edited by warehouse") and unassigned units stay unassigned. Set one and it works again.
- Only an active warehouse can be the default, and the default cannot be switched off. To retire it, make another warehouse the default first. The Set as default button is greyed out on an inactive warehouse.
- Your first warehouse becomes the default automatically. Later warehouses never take the role by themselves. If you added warehouses before this existed, none of them may be marked, so use Set as default once.
- Shipping. The default warehouse is also created the first time you save a ship-from address (from Shipping or while connecting a shipping carrier) on a store that has no active warehouse. It is named after your store (for example "My Shop Warehouse") and counts toward your plan's warehouse limit. If you already have a warehouse, saving a ship-from address only changes that warehouse's address. It never renames or promotes one. See Shipping overview.
- You cannot delete the default warehouse. Make another one the default, then delete.
- You cannot delete a warehouse that still holds stock or units reserved for open orders. Transfer all of its stock out first and let open orders ship or be cancelled. The delete is refused while any units remain, and the confirmation in the dashboard says so. The default warehouse can never be deleted.
- Switching a warehouse off (Inactive) keeps its stock in your total but nothing is sold from it, and it is not offered in the stock popover.
Show a warehouse as a store branch to AI shopping assistants (ChatGPT, Claude)
A warehouse is never shown to AI shopping assistants unless you switch it on. It is off for every warehouse, new and existing, and Brainerce never turns it on for you. A warehouse can be a back room, so being a warehouse does not make it a branch.
To show one: open the warehouse with Edit, scroll to Visible to AI agents and switch on Show this location as a branch. Then fill in:
- Public name (required). This is the name shoppers and assistants see. The internal name at the top of the form, and the phone in the address block, are never shared.
- Public phone, opening hours and a note for shoppers. Hours are free text, for example "Sunday to Thursday 9:00 to 18:00". They are not checked against anything.
- Show the street address. Off: the assistant is told only the city. On: it also gets the street, the postal code and the distance from the shopper. Coordinates are never shared in either case.
- Show whether products are in stock here. Shared as in stock, low stock or out of stock. An exact number of units is never shared.
- Shoppers can collect orders here. This is information only (see below).
- Show on these sales channels (at least one, required). The branch appears only on the channels you tick.
What the assistant can do with it: answer "is there a store near me" and "does that store have this product". Stock for a branch already leaves out the units another sales channel has protected, so a branch never promises more than this channel is allowed to sell.
Switching it off hides it at once. The next question an assistant asks no longer includes the branch. Nothing is stored by the assistant on your behalf, but an assistant may remember what it was told earlier in a conversation.
What this does not do:
- It does not create pickup at checkout. The Shoppers can collect orders here option only tells assistants that collecting is possible. A shopper can collect an order only if you also have a local pickup shipping rate (see Shipping).
- It does not reserve stock. The in stock answer is a guide. The real check happens at checkout.
- It does not publish a store locator on your website, and it does not change the warehouse's address, stock, priority or which warehouse ships an order.
- It does not promise that assistants will recommend your branches or send you visitors. It only gives them accurate answers when they ask.
- It is not copied by a catalog export or import. The setting stays in the dashboard, so an imported file can never publish a location. After restoring a store, switch your branches on again.
Add stock to a warehouse, including a new product's first units
A new warehouse starts empty, and so does a new product. To put stock into one, use Add stock to warehouse in Inventory, Warehouses (or the Add stock button inside a warehouse, which works even when the warehouse has nothing in it yet). Choose the Warehouse, search for the product, pick the Variant if the product has variants (a product set up with variants but none created yet cannot be stocked until you add them), type the Quantity to add, choose a Reason (Received from supplier, Stock count, Correction or Return restock) and add an optional Note such as an invoice number. The dialog shows what the warehouse holds now and the product's total stock before you confirm.
- The units are added to what that warehouse already holds. To overwrite a warehouse's number after a count, use Set quantity on the product's row instead.
- The product's total stock, the number your store sells from, is always the sum of all its warehouses, and it updates straight away.
- Stock you had before you used warehouses is not lost. When you add stock to a warehouse, any units the product already had that no warehouse holds are recorded in your default warehouse first, and the new units are added on top. If your store has no default warehouse, those units are recorded in the warehouse you are adding to. The same applies to stock you raised on the product page after setting up warehouses.
- Bundles (kits) cannot be stocked directly. Their stock comes from the products inside them.
- You do not need stock in another warehouse to do this. A transfer moves existing stock; adding stock brings in new units.
- Do not use this to record where stock you already have is kept. It raises your total. To place existing units in a warehouse, use Unassigned stock (next section).
Assign stock you already have to a warehouse
Products you created before setting up warehouses have a stock total but no warehouse holding it. Until you assign it, Brainerce counts that stock as sitting in your default warehouse. The Unassigned stock button in Inventory, Warehouses appears whenever any product or variant is in this state and lists each one with its store total, how much warehouses hold, and how much can be assigned.
To assign one item, click Assign, choose the warehouse and how many units, and check the before and after numbers for each warehouse before confirming.
- Your total stock does not change. Assigning only records which warehouse holds units you already have. It never adds or removes stock, so it does not affect what customers can buy.
- You cannot assign more than is unassigned. If a product has 10 units and none are in a warehouse, you can assign up to 10. Assigning 4 to a new warehouse leaves 6 in the default warehouse and 4 in the new one, still 10 in total.
- Units reserved for open orders are never moved. They stay in the default warehouse, so existing orders keep their stock. The list shows how many units of each item are reserved.
- Choosing the default warehouse records all unassigned units there at once. The quantity is fixed in that case.
- Products with variants are assigned one variant at a time. Each variant has its own row.
- If your store has no default warehouse, units you do not assign simply stay unassigned until you do.
- Every assignment is recorded in the stock history with a change of zero, because the total stayed the same.
To assign everything at once, click Assign all, choose a warehouse, and review the preview: how many products and units will be assigned, and which items cannot be (for example, every unit is reserved for orders, or warehouses already hold more than the product's total). Large stores are processed in batches automatically; keep the window open until it finishes.
Choose which warehouse ships an order: priority or nearest to the customer
With two or more warehouses, Ship orders from in the toolbar of Inventory, Warehouses decides which warehouse each order line is taken from:
- Highest-priority warehouse (the default): the warehouse with the highest priority number that holds the whole line, wherever the customer is. Set each warehouse's priority when you edit it.
- Nearest warehouse to the customer: the warehouse closest to the shipping address that holds the whole line. Priority breaks ties.
What "nearest" needs to work:
- At least two active warehouses with a location. A warehouse gets its location when you pick its address from the suggestions in the warehouse form. A warehouse without a location is only used when no located warehouse has the stock. The default warehouse created from your ship-from address has no location until you edit its address.
- The customer's address picked from the address suggestions at checkout. An address typed without choosing a suggestion has no location, and that order ships from the highest-priority warehouse instead.
- The choice is made when the order is placed. Changing the rule affects new orders only.
- The rule never makes an order fail. If the nearest warehouse cannot ship the whole line, the next one that can is used.
The customer's map location is used only to choose the warehouse. It is not copied onto the order.
See and change which warehouse ships an order
When your store has warehouses, every line on an order shows Ships from with the warehouse your team should pick and pack it from.
- Change it before the order ships. Open the order and choose another warehouse next to Ships from. The stock held for the order moves with it: the units go back to the old warehouse and are held at the new one.
- The new warehouse must hold the whole line. If it does not have enough unreserved stock, the change is refused and nothing moves.
- You cannot change it once the order has shipped, has been fulfilled in part, or has a shipping label. Cancel the label first if you need to switch.
- Inactive warehouses cannot be chosen.
- Bundle (kit) lines cannot be moved here yet. Each item in a bundle ships from its own warehouse.
- A line marked "No warehouse assigned" has no warehouse on record. Usually its product's stock was never assigned to a warehouse (see Assign stock you already have, above); occasionally no single warehouse had the stock when the order was paid. Choose a warehouse that has the stock before packing. Orders that have already shipped or been cancelled do not show this.
- A line that could only be partly placed (for example 3 of 5 units, after payment) shows the warehouse for the 3 and a warning with how many units have no warehouse. Choose one warehouse that holds the whole line to place all of it.
- If the stock records for a line do not match its warehouse, changing the warehouse is refused and nothing moves; the product's warehouse stock needs correcting first.
- Ships from only appears when your store has two or more active warehouses.
- Each change is recorded with who made it, but the order screen does not show a history of warehouse changes yet.
- Seeing the warehouse needs permission to view inventory; changing it needs permission to fulfill orders.
Why a product shows in stock but cannot be ordered
Once a product's stock is split across warehouses, Brainerce only accepts an order line that one active warehouse can ship in full, unless you turn on splitting (next section). It checks this before the customer pays: when the item is added to the cart, when the quantity changes, and when stock is reserved for checkout.
- Example: a product has 3 units in Warehouse A and 3 in Warehouse B. Your store total is 6, but a customer can order at most 3 in one line, because no single warehouse holds more. With splitting turned on, they can order all 6.
- Stock in an inactive warehouse cannot be sold. It still counts in your total, but no order is taken against it. Activate the warehouse or transfer the units out.
- Unassigned stock counts as being in your default warehouse. Products you have not stocked into any warehouse are not affected at all, and stores that do not use warehouses work exactly as before.
- Products that allow backorders, and products whose stock is not tracked, are never blocked by this check.
- The customer sees the usual "only N available" message, where N is the most one warehouse can ship.
- An order that is already paid is never refused by this check. If stock moves between checkout and payment, or the order was paid outside Brainerce (an imported order, a subscription renewal, an order created as paid), it is accepted with no warehouse assigned to that line. The order screen flags that line as No warehouse assigned so your team picks one before packing.
Ship one order line from two warehouses (splitting)
By default an order line must come from a single warehouse. Turn on Split a line across warehouses when needed in the toolbar of Inventory, Warehouses to let a line draw on several warehouses when no single one holds the whole quantity.
- It only splits when it has to. If one warehouse can ship the whole line, that warehouse is used, so the customer gets one parcel.
- How the units are divided: warehouses are taken in the same order as your Ship orders from rule (priority, or nearest to the customer), each giving what it has until the line is covered. Example: 3 units in A and 3 in B, an order for 5, ships 3 from A and 2 from B.
- Customers can order up to the total of all active warehouses. Stock in inactive warehouses is still never sold.
- The order shows the split next to Ships from, for example "Main ×3 · Branch ×2". Each warehouse packs its own part.
- Cancelling, refunding or fulfilling a split line returns or removes the units at the warehouses they came from. A partial refund or partial fulfilment of a split line may take the units from either warehouse; the stock totals always stay correct.
- To change a split line's warehouse, choose one warehouse next to Ships from: the whole line moves there, provided that warehouse holds all of it. You cannot move only one part of a split.
- Bundles (kits) are never split. Each item in a bundle must come from a single warehouse that holds all of it, even with splitting turned on.
- Turning splitting off affects new orders only. Orders already split stay split.
Suppliers
A supplier is who you buy from. Keeping supplier records turns "reorder these" into a purchase order you can send, and gives cost prices somewhere to live.
Click Add supplier in Inventory, Purchase orders, on the Suppliers tab. A supplier has these fields:
| Field | Required, limit |
|---|---|
| Company name | Required, up to 200 characters. |
| Contact name | Optional, up to 200. |
| Optional, must be a valid address. | |
| Phone | Optional, up to 50. |
| Website | Optional, up to 500. |
| Street, City, State / Region, Country | Optional, street up to 200, the others up to 100. |
| Postal code | Optional, up to 20. |
| Notes | Optional, up to 2,000. |
| Lead time (days) | Optional, 0 to 365. The days from placing an order to delivery. |
| Active | On by default. |
Lead time is only a suggestion: when you pick the supplier on a new purchase order and no Expected delivery is set yet, it fills in today plus the lead time and says so. Change the date freely, and a date you picked yourself is never replaced. A supplier with no lead time suggests nothing.
The list shows Company, Contact, Email, Phone and Status. The Email matters: it is where Send to supplier goes on a purchase order. A supplier cannot be undeleted (the confirmation says so), so switch it to inactive instead if you may buy from them again. Only active suppliers can be picked on a new purchase order. Deleting a supplier does not delete its purchase orders, but they lose the link to the supplier record, so sending one by email needs the address typed in again.
Purchase orders
A purchase order is stock you have ordered but not yet received. Create one against a supplier, list what you're buying and at what cost, and then:
- Receive it when the goods arrive. This is what raises your stock.
- Cancel it if it never turns up.
The value of doing this rather than just editing stock when a box arrives is that incoming stock becomes visible before it lands: once an order is Ordered, its units show in the Incoming column of the Inventory page, so you can see what's covered without counting boxes. A draft does not count.
Each purchase order gets its own running number, such as PO-0001, so you and your supplier can refer to it. A new order starts as a draft. Mark as ordered once you have placed it. You can move an order back to draft only while nothing has been received. Receiving and cancelling each have their own button, and an order can't be set to received any other way.
The list shows Reference, Supplier, Status, Items, Expected, Created and Total. If the list cannot load, a message says so and offers Try again; your existing orders are not lost.
Click New purchase order. Pick the Supplier, and fill in PO number / reference, Expected delivery, Destination warehouse (optional: where the units are meant to go), Payment terms (Net 30, Net 60, Net 90, Cash on delivery, Prepaid or Due on receipt), Shipping cost, Order discount and Internal notes. Also optional: Carrier, Tracking number and Currency (see below). Under Line items use Add item for each product (and variant): quantity (a whole number, 1 or more) and Unit cost (0 or more, two decimals). A product already on the order is not offered again, except a product with variants: pick the variant on each line, and the same product can appear once per variant. Shipping cost and order discount cannot be negative. The summary shows Subtotal, Discount, Shipping and Total. An order needs at least one item and can hold up to 500.
The statuses are Draft, Ordered, Partially received, Received and Cancelled. You can edit a draft or ordered order that has nothing received yet: open the order and press Edit to change the supplier, dates, destination, notes, costs and lines. A received or cancelled order cannot be edited, and neither can the lines of an order once any units were received. A line already on the order keeps its product; to swap one, remove the line and add another.
Supplier SKU, carrier, tracking number and currency
- Supplier SKU. Once a supplier is picked, each line has a small box for Supplier SKU, the code that supplier uses for the product. It is printed on the PDF (a Supplier SKU column appears only when some line has one). Brainerce remembers it for that supplier and product, together with the unit cost, so the next order from the same supplier starts with both filled in. A SKU or cost you type yourself is never replaced by the remembered one, and the latest order's SKU is the one remembered. There is no screen to manage these remembered SKUs; they are learned from the orders.
- Carrier and Tracking number are plain text for your own reference and for the PDF. Brainerce does not track the shipment or contact the carrier.
- Currency. An order is in your store's currency unless you pick another one (for example when you buy in dollars). The unit costs, the totals and the PDF then show that currency. There is no conversion: an order in another currency can be received and raises stock as usual, but it can never update a product's cost price, because cost prices are kept in your store currency. The Update product cost choices are switched off in the receive window for such an order. Leave the cost price alone, or set it by hand in your own currency.
Receive stock from a purchase order
Open the order and press Receive. Enter how many units arrived for each line, and choose the Destination Warehouse (a warehouse, or Unassigned (no warehouse)). It starts on the order's own destination warehouse when it has one, otherwise on your default warehouse. You can receive in several rounds: the order shows Partially received and N remaining per line until every line is in. You cannot receive more than is still remaining on a line. Receiving is what raises your stock.
Update the product's cost price when you receive
Not for an order in another currency than your store's: see Supplier SKU, carrier, tracking number and currency. Such an order is received without touching any cost price.
In the receive window, Update product cost decides what happens to each received product's (or variant's) cost price:
- Do not update (the default): the cost price stays exactly as it is. Nothing you typed by hand is overwritten.
- Last cost: the cost price becomes the Unit cost on that purchase order line.
- Weighted average: the new cost price is the average of the units you already hold (at the current cost price) and the units you are receiving (at the line's unit cost), weighted by quantity. If you hold none, or the product has no cost price yet, it becomes the line's unit cost.
The table in the window shows, for each line, the units In stock, the Receiving quantity you enter, the Current cost, the order's Order cost and the New cost, and it updates as you change the choice or a quantity, so you see the result before you confirm. The choice applies only to the receipt you are making; it is not remembered, so pick it each time. A line with no unit cost never changes a cost price. For a product with variants, the variant's cost price is the one that changes; a variant with no cost price of its own is weighed against the product's. Orders you already placed keep the cost they were sold at, so past profit reports do not move. New orders use the new cost price.
Close an order that will never arrive in full
When part of an order arrived and the rest will not (the supplier is out of stock, the goods were lost), open the order and press Close with remainder. The order becomes Closed short in the list, and the units that never arrived stop counting as Incoming on the Inventory page. Closing changes no stock and no cost price, and it cannot be undone. It is offered only on a Partially received order: an order nothing arrived on is cancelled instead.
Cancel order is offered on a draft or an ordered order that nothing has been received on. It is not available once something was received (use Close with remainder) or once an order is fully received, and cancelling cannot be undone.
Download a purchase order as a PDF
Open a purchase order and choose Download PDF. This works for drafts too. The PDF shows the order number, the date, the expected delivery date, your business details, the supplier, the delivery address, every item with its SKU, quantity and unit cost, the totals, and the payment terms.
- Your business details come from Settings → General, under Business details for documents: your legal business name, your tax ID or company number, and your business address. You need the Manage store settings permission to see and edit that section. If you leave them empty, the PDF uses your store name.
- The delivery address is your main warehouse.
- Internal notes are never printed. The notes field on a purchase order is for your team only, so it never appears on the PDF or in the email to the supplier.
- Hebrew and English are both supported. Hebrew documents read right to left.
- If an item has no unit cost, the PDF says the totals only cover the priced items.
Send a purchase order to your supplier by email
Choose Send to supplier to email the purchase order PDF straight to your supplier. Before anything is sent you see who it goes to, the subject line, and an optional message to the supplier. The email goes out only when you press Send.
- The supplier needs an email address. If they don't have one yet, enter it in the send window and it can be saved on the supplier for next time.
- You can see what happened. The order shows whether the email is still sending, was sent (with the time and the address), or failed and why. If the supplier's address bounced or marked your mail as spam in the past, we won't send to it, and the order tells you so.
- What the supplier received is kept. We keep a copy of every PDF that was emailed, so you can always check exactly what the supplier got, even if you edit the order afterwards.
- Sending again is a deliberate choice. To resend an order that was already sent, tick the confirmation box. Pressing Send twice by accident sends one email.
- Replies come to you. The email's reply address is your store's reply address from your email settings, or your store contact email.
What sending a purchase order does not do
- Sending does not mark the order as ordered. An email is not proof that the supplier received or accepted your order. Press Mark as ordered yourself once the supplier confirms.
- It doesn't change your stock. Stock only goes up when you receive the order.
- Cancelling an order doesn't email the supplier. Let them know yourself.
- There is a daily limit of 50 purchase order emails per store, to protect your sending reputation.
Stock counts (there is no stock count screen)
Brainerce has no stock count screen: you cannot record what is on the shelf, compare it with what Brainerce expects, and post the difference in one step. After counting the shelf, use Set total with the reason Stocktake adjustment on each product, or import a stock CSV from the Inventory page (see Updating a lot of stock at once). Each change is recorded in the movement history with its reason.
Backorders
When something sells out there are three options per product. For a simple product, the stock popover on the Inventory and Products pages has a Backorder control, right next to the quantity: choose Allow or Notify and, if you want one, a unit limit. For a product with variants, each variant has its own Backorder control in the variant stock popover, so a product can mix variants that allow backorders with ones that don't. To set the same policy on every variant at once instead of one at a time, ask the AI assistant ("allow backorders on this product, up to 20 units"). Either way it only applies to an item with Manage Inventory on. A product or variant you have not touched is on Block. An assistant connected over MCP can set it too, on a product or a variant, the same control the stock popover and the AI assistant write. A duplicate keeps the setting of the original.
| Mode | What happens |
|---|---|
| Block | Out of stock means unbuyable. This is the default. |
| Allow | Customers can keep ordering past zero, with no extra message from Brainerce. |
| Notify | Customers can keep ordering past zero. The item is marked "allow purchase and notify the customer", which a storefront can use to show a backorder message. |
Backorders in the cart and at checkout
An item on Allow or Notify at zero stock can be bought. Brainerce lets it into the cart, reserves it where your store reserves stock in the cart or at checkout, passes the stock check at checkout and creates the order, until the backorder limit is reached. Every one of those steps uses the same rule, so the cart does not flag the line as unavailable and the checkout does not refuse it with "Some items are out of stock" while room is left under the limit.
- A product you have not touched stays on Block. Nothing changes for it: at zero stock it is sold out, the cart flags it and the checkout refuses it, exactly as before.
- Available goes below zero while orders are on backorder. The units on the shelf stay at 0 (your on-hand count does not move when a backordered order is placed), but every unit sold past zero is Reserved, so Available (on hand minus reserved) shows a negative number, for example -3 for three units on backorder, until you receive stock. A backordered item still reads as out of stock while it can be bought. A storefront tells the two apart: "can be ordered" is yes and "in stock" is no, and the storefront itself never sees a negative stock number. If you ship a backordered order before entering the stock you received, your on-hand total goes below zero too, until you set the real count.
- You cannot switch an item back to Block while units are on backorder. Receive the stock or enter the real count first, so the number is zero or higher. Cancelling the backordered orders also works, because a cancelled order releases its units. Allow, Notify and a new limit are always possible.
- Your storefront words it. Brainerce does not add a "ships later" message on its own. A storefront scaffolded from the next
create-brainerce-storerelease (the label is not in 1.89.0 or earlier, which is whatnpx create-brainerce-storeinstalls today) prints "Available on backorder" next to the buy button for a backordered item, and "Out of stock" only for an item that cannot be bought. Every storefront scaffolded before that release prints "Out of stock" next to an Add to Cart button that works, because its labels look at the stock count alone. The stock rules you set in the dashboard still apply: the item can be bought and goes on backorder whatever the label says. The labels need updating (by your developer or the AI storefront builder). Place a test order and check the wording before you rely on backorders. - Each variant has its own setting. A shopper who picks a variant is judged by that variant's setting, not the product's.
- Kits cannot be backordered. A kit sells only what its parts can build. A part on Allow or Notify does not make the kit buyable at zero.
- A channel that has stock reserved by another channel cannot backorder that item. While another sales channel holds reserved stock on the item, the backorder rule is off for it, so a backorder never eats stock promised to another channel.
- Ship backordered orders after you receive the stock. Enter what arrived first (Set total, or receive a purchase order), then mark the backordered orders as shipped. Marking an order shipped before the stock is entered takes your on-hand total below zero until you set the real count.
- Connected platforms are told 0, not a negative number. The stock Brainerce sends to other platforms never goes below zero.
Notify does not mean "tell me when it is back". Brainerce itself lets the order through exactly as it does for Allow and does not send the customer or you an email because of it, so any backorder wording shown to shoppers comes from your storefront. Neither Allow nor Notify collects a back-in-stock waitlist, because the product is meant to stay buyable. The back-in-stock waitlist only works for items on Block, so a sold-out item on Allow or Notify gives a shopper neither a way to order nor a way to ask to be told.
The backorder limit is the most units allowed on backorder, counted beyond the stock you hold: with 10 in stock and a limit of 20, up to 30 units can be ordered. Units already on backorder use it up: once 20 units are on backorder, the item reads sold out again until you restock, and a customer asking for more than the room left is told only that many are available. It is a whole number of 1 or more, and empty means no limit. It stops "allow" from becoming an unbounded promise you can't keep. Switching an item to Block clears its limit, because a Block item has no backorders to limit: if you later switch it back to Allow or Notify, enter the limit again, or the item has none. You cannot change the tracking mode of a product while units are reserved for orders.
The movement ledger
Every change to stock (a sale, a receipt, an adjustment, a CSV import) is recorded as a movement. When a number looks wrong, the ledger is what tells you which event produced it. You read it per product from Stock movements in the row menu of the Inventory page (the last 20 changes), or for the whole store in Inventory, Stock journal (see See every stock change in the whole store). Each movement records the warehouse it happened in, except movements made by customer orders and older ones.
What's next?
- Adjust stock levels is the day-to-day version of all this.
- Low-stock alerts cover being told before you run out.