 Brainerce Help
Media library
One place for every image and file in your store, with folders, alt text, usage tracking, and AI image editing.
Assets in the sidebar is your store's media library. Every image you upload to a product, a category or a blog post lands here, and you can upload files directly too.
Uploading images and videos: formats and size limits
Drag files onto the grid, or use Upload in the toolbar:
- Upload files to pick individual files.
- Upload folder to pick a folder and bring its contents in with it. Each image or PDF in a folder upload can be up to 10 MB; videos have no separate limit (see below).
Accepted formats: images in JPEG, PNG, WebP, GIF or AVIF, and videos in MP4, WebM, MOV or M4V. A PDF can only come in through Upload folder (a single Upload files pick refuses it). Any other file type is refused. There is no way to upload a ZIP, a Word file or an SVG here.
What happens to an image you upload: it is converted to WebP, anything larger than 2048 pixels on its longest side is scaled down, and a small thumbnail is made for the grid. A GIF that is animated stays animated. Videos are stored exactly as you sent them, with no conversion or compression.
Size limits: an image can be up to 10 MB, up to 50 files at once. A video has no size limit of its own: it can be as large as your remaining plan storage allows, up to 5 GB per file. Accepted video formats are MP4, WebM, MOV and M4V; any other video type is refused (in a folder upload it is skipped, and the rest of the folder still uploads). Large videos upload straight to storage, so keep the tab open until the upload finishes; closing it or losing the connection stops that video and it is not added to the library. Replace accepts a file up to 10 MB. Everything you upload counts against your plan's storage (Free 500 MB, Pro 5 GB, Growth 25 GB, Enterprise 100 GB): once you are full, new uploads are blocked until you delete files or upgrade. See Plans & limits.
Folders
The left panel is a folder tree. Create one with New folder, then drag files into it, or select files and use Move to folder.
Deleting a folder deletes what's inside it (subfolders and files), and the confirmation ("This will delete 2 folders and 14 files.") tells you how many that is. Read that number before confirming. After you confirm, an Undo button shows in the notification for about 8 seconds: press it to bring the folder and everything in it back. Once that notification is gone there is no undo in the dashboard. Deleting a folder needs Edit products, the same as deleting a file.
Finding things
- Search by filename.
- Filter by type: images, videos, or other files.
- Filter by usage: In use or Unused. This is the useful one: it shows you what you can safely clear out.
- Sort by name, date, or size.
- Switch between grid and list, and change density if you want more on screen.
File details
Click a file to open the inspector. You can edit its Name, Alt text and Description (shown as a tooltip on hover), then press Save Changes. It also shows the filename, type, size, dimensions, upload date, folder and what uses it: as a product image, as a variant image, or on categories, brands, tags, modifiers, the store logo, a sales channel logo, an event cover or a donation campaign cover. It says plainly when nothing does.
Who can do what. Anyone who can View products can browse the library. Uploading, renaming, moving, replacing, editing and deleting need Edit products, which Owner, Manager and Staff have and Viewer does not.
Set alt text here. It describes the image for screen readers and for search engines, and it is the single highest-value field on this page for SEO.
If your store sells in more than one language, the alt text field has a tab for each language. The first tab is your default language, and a language you leave empty shows the default one. Saving copies the alt text to every product and variant that uses the image, except a product where you wrote its own alt text for that image: that one is kept and is not translated. See Write image alt text in each language.
You can also download, replace (swap the file while keeping every reference to it), or delete.
Replace is the safe way to update an image. Uploading a new file and swapping it on each product leaves the old one orphaned; Replace updates it everywhere at once.
Editing images
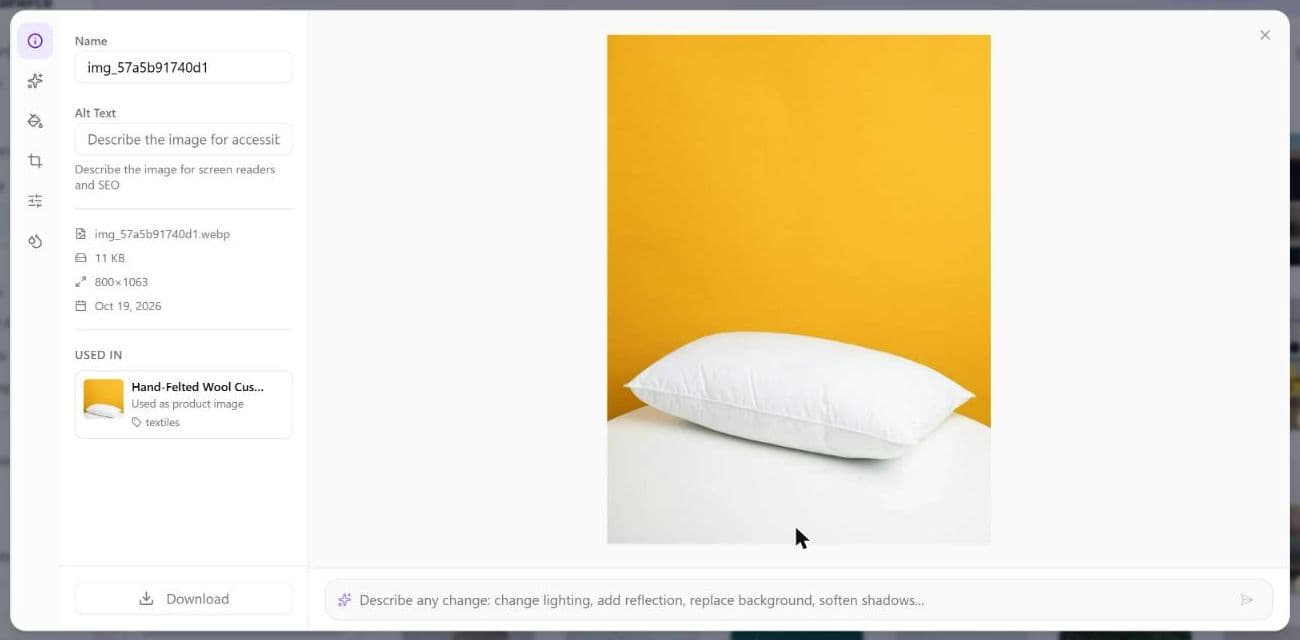
Open an image and choose Edit image (Edit / Crop). The editor has a tool strip with these tools:
- File Info: the file's properties.
- AI Tools: Remove Background (fast, runs in your browser, no credits), Replace Background (describe the new one, press Enter or the button), Image Enhancement (Upscale none, 2x or 4x, Color Correction, Sharpening) and Generate Variations (choose how many).
- Smart Edit: paint over an area with a brush (Paint or Erase, with a brush size and Clear mask), describe what should change there, and press Apply change.
- Crop & Resize: Aspect Ratio (Freeform, Square (1:1), Landscape (16:9) or Portrait (9:16)), Zoom, Rotation and Flip horizontal or vertical, with Reset.
- Adjust: Brightness, Contrast, Saturation, Temperature, Highlights, Shadows, Auto Adjust, and ready-made looks such as B&W, Sepia, Warm, Cool and Vintage, each with an Intensity slider.
- Effects: Solid Background (fill the background with one color) and Drop Shadow (color, blur, offset and opacity).
Only images can be edited; the tool strip is reduced to File Info for videos and other files.
AI actions use credits. They run on the Pro plan or higher. See AI credits for what each one costs, and Edit a product photo with BOBO for doing the same edit by chat. Remove Background in the editor is free. Crop, adjust, filters and effects run in your browser and cost nothing.
When you finish, you can press Apply & Save to save over the original or Save as copy to keep the original and add a new file. Saving over the original updates it everywhere it's used.
Select, copy a link, download
- Each file has a menu with Copy URL, Download, Open in New Tab, Details and Delete.
- Tick files to select them. The toolbar then shows how many are selected, Select all, Clear selection, Move to folder and Delete Selected. Selecting also lets you download the files as one ZIP, up to 300 files or 400 MB at a time ("You can download up to 300 files (400 MB) at a time").
- The grid loads in pages; press Load More for the next page.
Deleting
Delete individual files from the inspector, or select several and use Delete Selected. There is also a Delete All, which is exactly as permanent as it sounds.
Check the Unused filter before any bulk delete, because a file that's in use will leave a gap on a product page. A picture used as an event cover or as a donation campaign cover counts as in use, so it is not in the Unused filter, and the file's what uses it list names those events and campaigns: deleting the picture clears the cover of every event and campaign that uses it, and they stay without an image. Deleting a file that is in use warns you first ("This image is used in 3 products. It will be removed from all of them."), and deleting several tells you how many of them are in use. Delete All asks "Delete all assets?" and permanently removes every image and file from your store's storage.
What's next?
- Add a product, where most images end up.
- AI credits, for what the AI image tools cost.