 Brainerce Help
Add a product
Step by step, add a single product with variants, images, inventory, and SEO so it's ready to sell on your storefront.
This article walks you through adding your first product to Brainerce. By the end you'll have a product live on your storefront with a title, price, image, stock count, and a clean SEO slug.
Before you start, make sure you have at least one image for the product (JPG, PNG, or WebP, ideally square 1:1 ratio).
Quick steps
- Go to Products in the sidebar.
- Click Add Product (top right).
- Fill in Title, Price, and Stock.
- Upload at least one Image.
- Click Save and your product is live.
The detailed walkthrough below covers each step plus variants, SEO, and what happens after you save.
1. Open the products page
From the dashboard sidebar, click Products. You'll see the products list, empty if this is your first product, or a table of existing products like the one below.
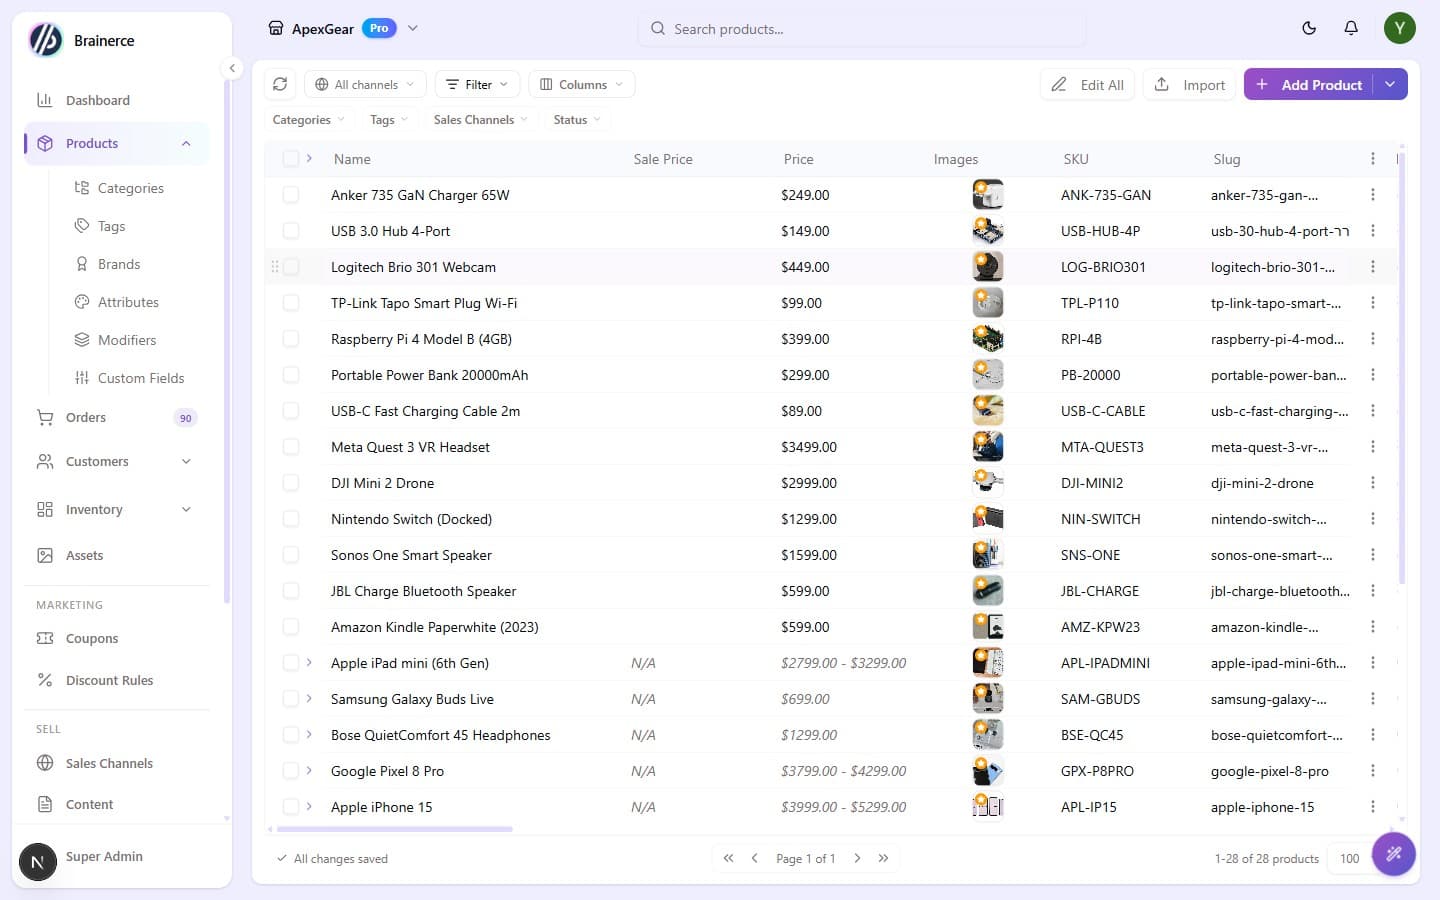
The Add Product button sits in the top-right corner. The split arrow next to it opens a dropdown with three ways to add: Add via form (the full editor, below), Add empty row (a quick inline row you fill right in the table), and Scan with AI (snap or upload a product photo and let AI fill in the details for you). A separate Import button handles CSV/bulk import.
Click Add Product to open the editor.
2. Fill in the product name and price
The product editor opens with a blank form. Two fields gate the save button:
| Field | What goes here |
|---|---|
| Product Name | The product name customers see on your storefront (e.g. "Anker 735 GaN Charger 65W"). |
| Base Price | The list price in your store currency. Use a decimal (100, 49.90). Required for a simple product; a variable product prices each variant instead, so this one is skipped. A kit still needs a number here to save, but it only charges that number if the kit is on Fixed price: on the two contents-based pricing modes the kit costs what its contents cost and this field is ignored. See Kits. |
Inventory Status sits just below and defaults to In Stock. Switch it to Not for Sale to block purchase temporarily. It is not required to save.
Use Not for Sale only for something you are not selling. For a product that is sold out but coming back, turn Manage Inventory on and set the quantity to 0 instead: that is the only state that offers shoppers a back-in-stock waitlist.
Everything else (SKU, sale price, cost price, description, categories, brands, tags, SEO) is optional but recommended for a polished storefront.
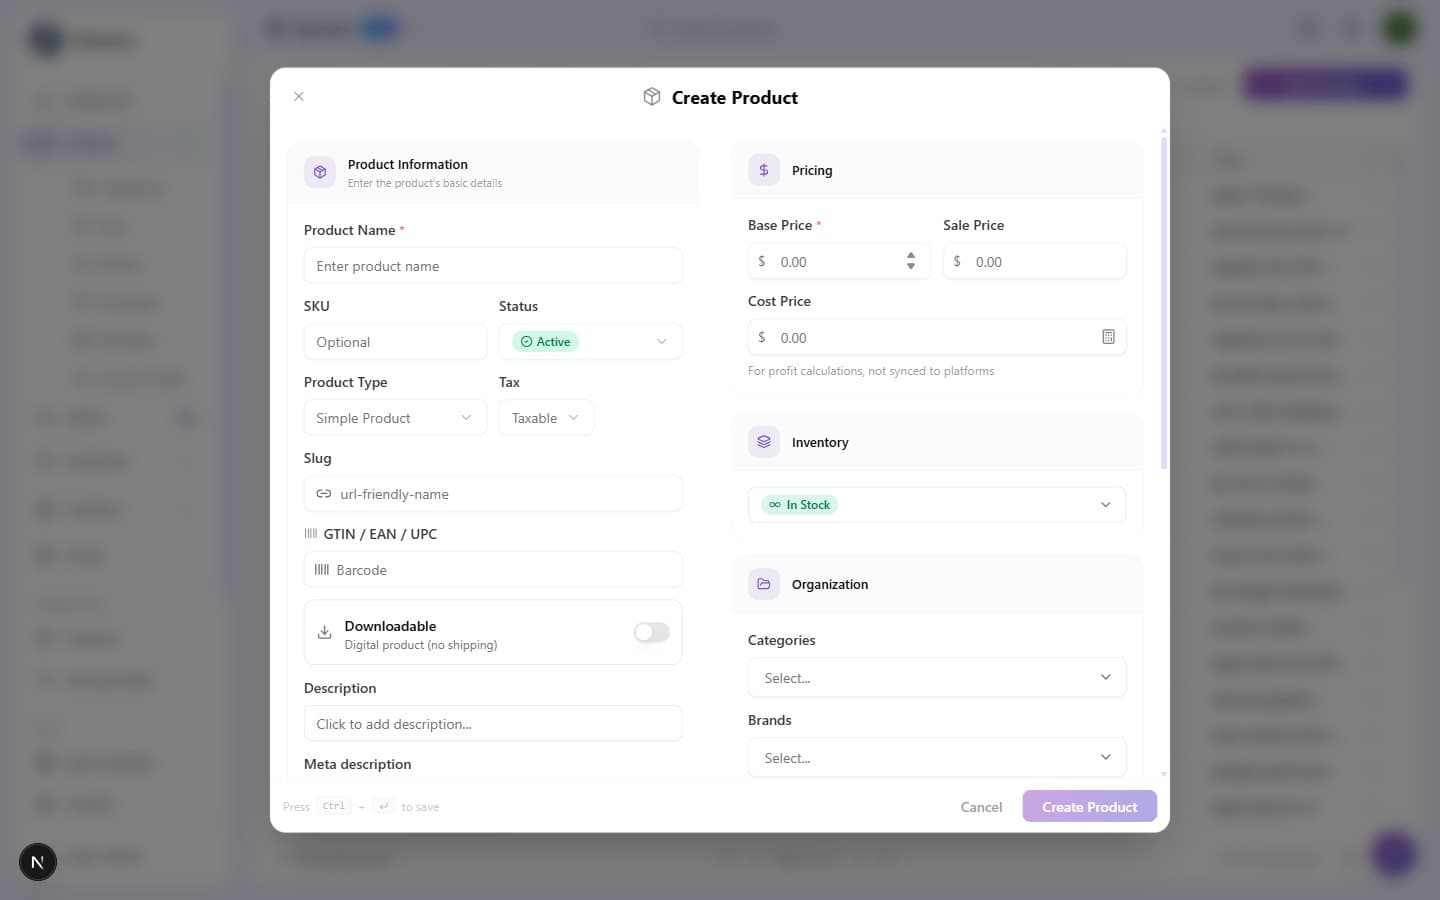
The modal lays out the product in two columns: Product Information (name, SKU, type, slug, barcode, description) on the left, and Pricing, Inventory, Organization (categories, brands, tags) on the right. Press Ctrl + Enter at any point to save without scrolling to the button.
Here's what a filled-in product looks like, an Anker 735 GaN Charger with SKU, price, category, and tags set:
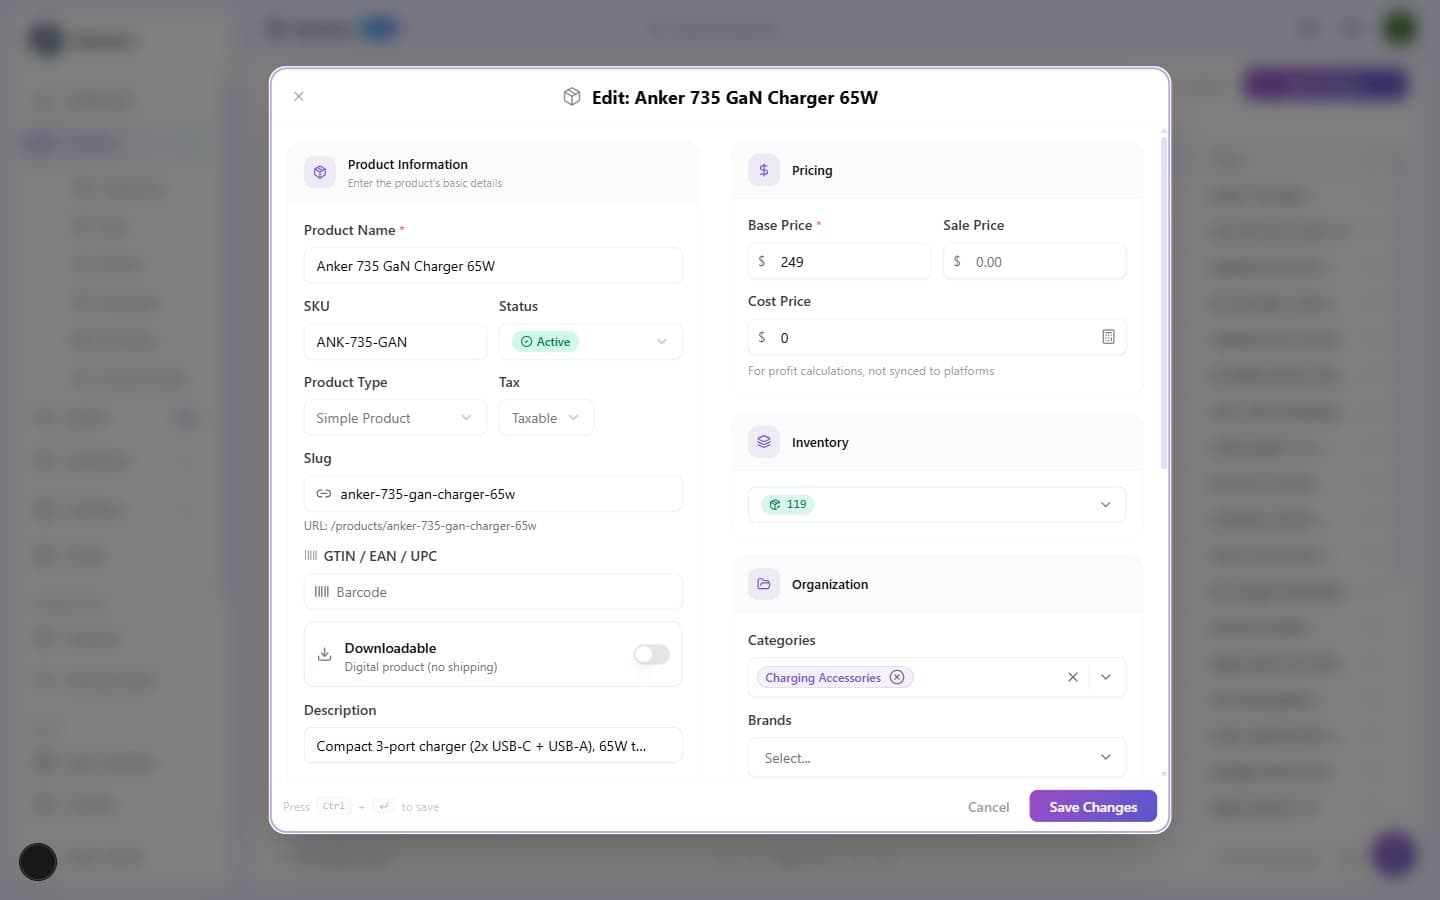
Start by typing the product name. It's the only field that has an effect on every other field (the slug auto-derives from it, the SEO title defaults to it, the social preview falls back to it).
Selling in more than one currency? These are the prices for your default region. Buyers elsewhere see them converted automatically, or the exact figure you choose, if you set one under Prices per Region. See Regions and currencies.
Three pricing fields, three different jobs
| Field | Shown on storefront? | Purpose |
|---|---|---|
| Base Price | Yes, strikethrough when Sale Price is set | The "regular" price. |
| Sale Price | Yes, main price when set | A temporary discount. Set to blank to remove the sale. |
| Cost Price | No, internal only | What you paid for the item. Used for profit reports only. Never synced to any storefront or marketplace. |
SKU vs barcode
- SKU is yours: any unique string that fits your inventory system (
ANK-735-GANworks great). It's the join key for accounting exports, warehouse tools, and the Inventory page's stock importer. On the Use the Brainerce template import it's also what decides whether a row is skipped as already-existing, but the default AI import ignores SKU entirely and will happily create a duplicate. See Bulk import from CSV. - GTIN / EAN / UPC (Barcode) is the global product code printed on the box. Required by Google Shopping, Amazon, and most marketplace feeds, so fill it in if you sell on those channels.
Tip: write a description even if it feels optional
The description appears on the product page and is the single biggest factor in whether a customer buys. Even one or two sentences ("Soft 100% organic cotton, fits true to size, machine washable") makes a noticeable difference in conversion vs. an empty description.
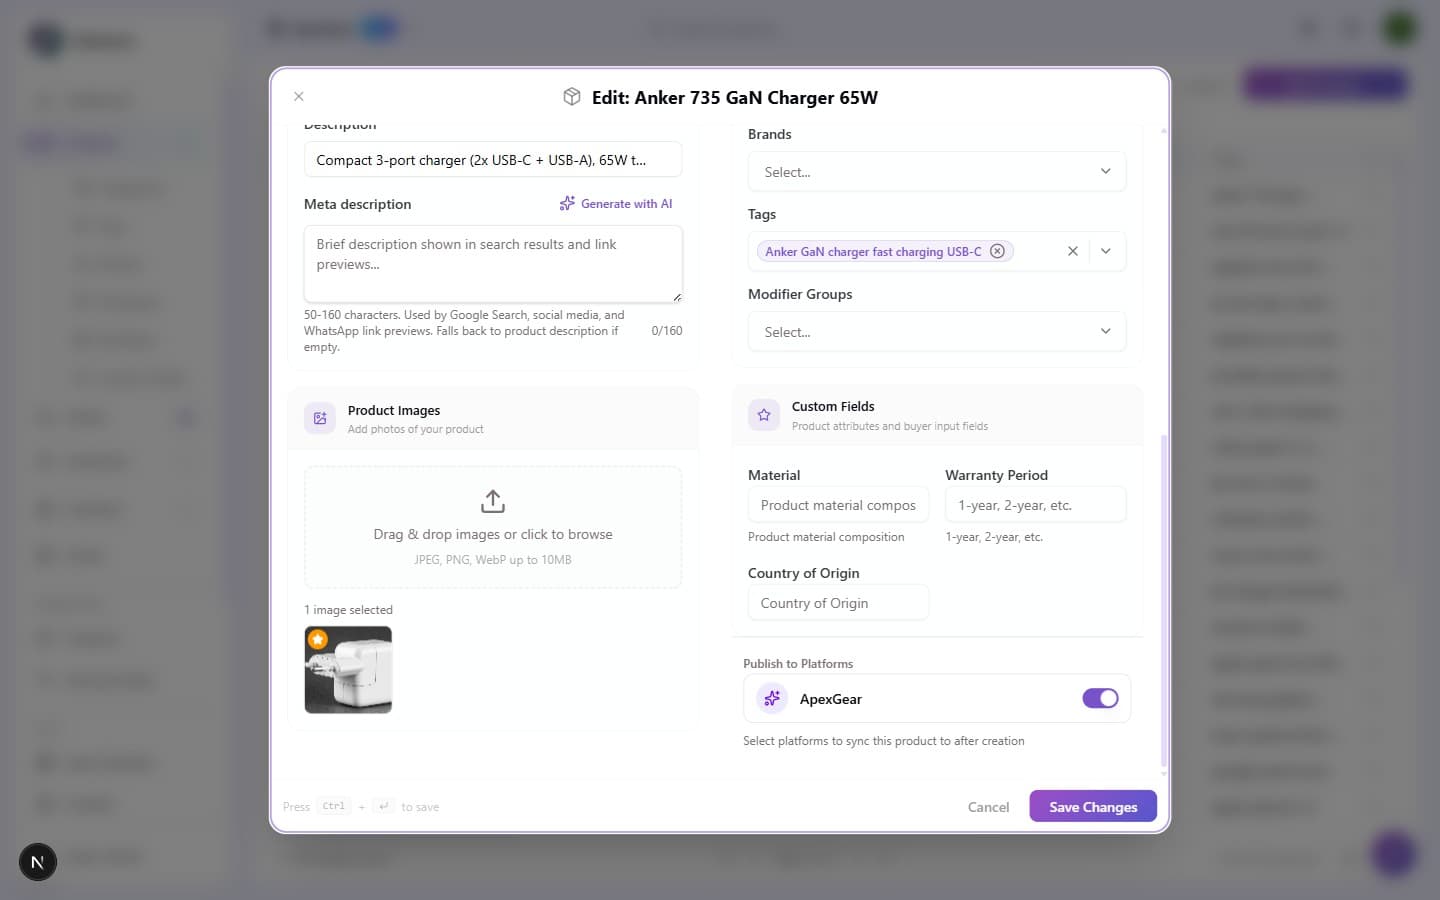
Scrolling down reveals the Description, Product Images upload zone, and the Publish to Platforms toggle in the right column:
3. Add product photos from the media library
In the Images section, open the Media Library to pick existing images or upload new ones (up to 20 per product).
- Single-click an image to make it the main image, the one shown on product cards (it gets a star badge).
- Double-click an image to open the asset editor, where you can adjust it and Remove background for a clean transparent version (powered by Brainerce's built-in AI).
- For best storefront layout, use square (1:1) images, because most product-card layouts assume square.
- Supported formats: JPG, PNG, WebP.
Why a product image isn't showing on the storefront
If a product looks fine in the dashboard but has no photo on your live store, the image is almost always still an external link rather than a file Brainerce hosts.
That happens when an image was added by pasting a web address, usually by BOBO, an AI employee, or a connected AI assistant working from a spreadsheet or a supplier list, instead of being uploaded to your Media Library. Brainerce copies those pictures onto its own servers in the background, and deliberately hides them from your storefront, cart, and checkout until that copy finishes. It is a short wait, not a permanent state. Reload the product after a minute or two; once the picture appears in your Media Library it is live everywhere.
If it never appears, the link was not a picture. The most common cause is a link to a page that displays a photo: a stock-photo listing on Pexels or Unsplash, or a search-results page, rather than to the picture file itself. Brainerce downloads the web page, finds no image in it, and gives up. A usable address ends in .jpg, .png, or .webp; on a stock-photo site you get one by using the site's own Download button, then uploading that file here.
You can see which state a picture is in without leaving the product. Open the product and look at the thumbnails in the Images section: one still being copied is labelled Uploading, and one that could not be copied is labelled Not uploaded in red. Hover either label to read the full explanation, including the reason the copy failed. A thumbnail with no label is hosted by Brainerce and live on your storefront.
One thing Brainerce will not do for you: it will not go and find a replacement picture on its own. A product whose image failed simply sells without one until you upload a new one, so it is worth scanning the Images section after a bulk AI import.
Asking an AI assistant to add product images
You can tell BOBO, an AI employee, or a connected assistant like Claude or ChatGPT to add products with pictures, and it will work, with one caveat worth knowing before you start a large import.
Give the assistant direct links to picture files (addresses ending in .jpg, .png, or .webp), or upload the pictures to your Media Library first and ask it to use those. Links to stock-photo pages will not work. See the section above for why, and how to get a usable link instead.
Also be aware that an assistant reporting "added 12 products with images" is telling you the products were saved, not that the pictures arrived. It cannot see your storefront. Spot-check a few products afterwards.
Spreadsheets are the usual trip-up. A column of blue "click here" style links in Excel hides the real web address behind display text, and an assistant reading the file may only get the words, not the link. Before handing over a sheet, paste the actual image addresses into a plain column as visible text.
Sell a digital or downloadable product
Selling an e-book, license key, or file instead of a physical item? In Product Information, turn on the Downloadable toggle. When it's on, Brainerce hides the Inventory section and skips shipping for this product. Use Configure download to attach the file and set an optional download limit (how many times a buyer can download) and download expiry (how long the link stays valid).
Do not sell a gift card or voucher as a product
Gift cards are real in Brainerce, but this form is not where they come from. No toggle here turns a product into a gift card, and no code is minted when someone buys one. A product called "Gift Card" is just a product: money comes in, and nothing issues the buyer anything they can spend.
There is no gift-card product type and no way for a shopper to buy a gift card on your website. If you list one anyway, you would have to watch for those orders and go and issue a card by hand for each of them, which is a manual step nobody remembers on a busy day.
Where gift cards actually come from: you issue them yourself on Marketing → Gift cards, by typing an amount and a reason. Brainerce mints the code, tracks the balance, emails it to a recipient if you give one, and lets the customer spend it at checkout. See Gift cards. They are still in rollout, so the sidebar entry has not appeared for stores yet.
A fixed-amount coupon is not a substitute for stored value. A coupon takes money off an order and vanishes when used, with no remaining balance and no record of what anyone still owes. If someone has paid you for a voucher, issue a real gift card for it instead.
4. Add variants (optional)
A variant is a version of the same product: a Small Red T-Shirt is one variant of "Cotton T-Shirt". If your product comes in multiple sizes, colors, or other options, add them here.
- Scroll to the Variants section.
- Click Add option group and pick an attribute (e.g. Size or Color).
- Add the values for that attribute (e.g. S, M, L).
- Brainerce automatically generates one variant per combination. For example, Size × Color with 3 sizes and 2 colors creates 6 variants.
- For each variant, set its own Price (defaults to the parent product price) and Stock.
Each variant tracks inventory separately. The product card on your storefront shows the sum of all variant stocks, and a variant with stock = 0 shows Out of stock at checkout.
5. Optimize for search (SEO)
Two fields inside Product Information control how your product appears in Google search results:
| Field | Purpose |
|---|---|
| Slug | The slug at the end of your product URL, e.g. /products/cotton-t-shirt. Auto-derived from the product name. |
| Meta description | Appears under the title in search results. 150 to 160 characters works best. |
There is no separate SEO title or social-preview image on a product; search engines and social cards fall back to the product name and its first image. For a store-wide SEO view, including per-product scoring and fixes, use SEO Autopilot.
Changing a slug is safe. When you rename a product's slug, Brainerce remembers the old address and your storefront automatically redirects it (a permanent 301) to the new one, so the old link keeps working and the page keeps its Google ranking. The same applies to blog post slugs. One caveat: the redirect is performed by the storefront itself, so it works on storefronts built with the current Brainerce template or integration guide. A storefront built before this feature needs a rebuild or update to pick it up.
If you leave SEO fields blank, Brainerce auto-generates them from the product title and main image, and you can always come back and refine later.
Time-savers and extra fields
A few helpers and conditional fields that appear depending on your setup:
- Generate with AI. On an existing product, the SEO description field has a Generate with AI button that writes a description for you.
- Calculate base price. The Cost Price field has a button that works out a base price from your cost using the store's pricing formula. See Pricing formulas for how the formula is picked, and note that on a product you have already saved the calculation reads the product's stored categories, brands and tags rather than what is currently selected in the form.
- Tax behavior. When your store collects tax, a Tax behavior field (Taxable / Exempt) appears so you can exempt specific products.
- MPN. When the Google app is installed, an MPN field appears next to the barcode for product feeds.
- Translate. On a multi-language store, a language switcher in the modal header lets you write (or AI-translate) the name, description, slug, and SEO per language.
6. Organize and connect to channels
Scrolling further down the modal exposes the rest of the optional but high-value fields:
| Field | When to use it |
|---|---|
| Categories | The product's place in your catalog tree. Drives storefront menu navigation and category landing pages. A product can sit in multiple categories. |
| Brands | The manufacturer or label (e.g. Anker, Apple). Used for brand filters on the storefront and brand-based reports. |
| Tags | Free-form labels for cross-cutting attributes that aren't categories (e.g. bestseller, summer-sale, new-arrival). Use these to power collection filters. |
| Modifier Groups | Add-ons or customizations that change the variant at checkout: toppings on a pizza, engraving on a watch, extended warranty on a charger. Attach a group you've defined elsewhere; the customer picks from it on the product page. |
| Custom Fields | Extra structured data you've defined in Products → Custom Fields: specs, certifications, buyer input fields, anything beyond the built-in fields. The section appears in the right column whenever you have at least one active custom field. |
| Publish to Platforms | The list of your shops. Tick each shop this product should be on sale in. A product you have not ticked cannot be bought on that shop. It stays out of the catalogue, and it cannot be added to a basket even by someone with a direct link. Every toggle starts off, so a new product is on sale nowhere until you tick a shop, and it also has to be Active rather than Draft. Installed marketplace apps that carry a product feed (Google is the one in the marketplace today) appear in this same list. Shopify and WooCommerce never appear: products are never pushed to them. |
You can leave every one of these blank for now and add them later from the product page; none of them block saving.
Filling in custom field values
If your store has custom fields defined, a Custom Fields section appears in the product editor, both when creating and when editing a product. The section splits into two groups:
- Product Attributes are descriptive fields about the product (specs, materials, certifications). All active attribute fields appear here for every product.
- Buyer Input Fields are fields your customers fill in before adding the product to their cart (engraving text, gift message, custom color). Only fields marked as applies to all products appear at creation time; product-specific input fields can be added after saving.
Fill in the values directly in the form and click Save, and the values are saved together with the rest of the product data.
7. Save the product and publish it as Active or Draft
There is one save button: Create Product on a new product, Save Changes when editing. What decides visibility is the Status select higher up the form:
- Draft means saved to your catalog but not visible on the storefront. Useful for products you're still preparing.
- Active means live on your storefront immediately.
You can flip between draft and published from the products list anytime by clicking the status badge.
After saving, you'll return to the products list. Your new product appears at the top with an Active badge once it's published.
A few things to check on the new row:
- Image thumbnail is pulled from the first image you uploaded. Click the row to add more.
- Sales channels icon confirms which storefronts and marketplaces will sync this product. If you toggled Publish to Platforms in the modal, the relevant channel icon appears here within seconds.
- Price column shows the base price; if you also set a sale price the base price is struck through and the sale price wins.
- Status badge: Active = live; Draft = saved but hidden. Those are the only two.
To keep editing, click a cell to change it inline, or use the row's ⋮ → Edit in Form to reopen the full editor. There is no separate product detail page; everything happens in the table and the editor modal.
What's next?
- Bulk import. Adding 50+ products? Use the Import button to upload a CSV instead of clicking through one product at a time.
- Connect a sales channel. Make your products available through your headless storefront, or feed them to Google. Not Shopify: there is no Shopify app, and products are never pushed there. See Connecting sales channels.
- Set up shipping. Configure rates and zones before customers can check out. See Shipping setup.
- Take a test order. Use Sandbox payment mode to place a test order against your own store and verify the full flow. See Taking a test order.
Introduction to products
Understand the three product types in Brainerce, simple, with variants, and kits, plus modifier groups, and how categories, brands, and tags organize your catalog before you add your first product.
Manage products
Product status, editing, duplicating, translating, bulk actions, inline editing, and per-channel/per-language overrides.